In this session i am providing you the steps to create a simple EC2 LInux instance and it's putty configuration .
1. Login to https://aws.amazon.com and sign in using the credentials as below


6.Configure the instance details as below as
Number of instances 1


8. 8. We can tag the instance as below, here I am giving the instance name as “webserver

9 Then we have an option to configure the security groups ( which means the firewall rules for specific ports need to be opened)


11. you will get the below screen while launching the instances

12. Finally our instances are ready which is names as webserver


14 Also you need to download “puttygen”( http://www.chiark.greenend.org.uk/~sgtatham/putty/download.html) before connecting using putty to configure public & private key for the instance
Launch putty gen and click on “load” option , select all files from the drop down list and locate the .pem file ( unixchips1.pem) which we saved earlier . If correct file is located you will get a message as below .


15. There is an option to save the private key (.ppk) format and save that in your desktop. Here I have saved as unixchips1.ppk in my desktop
16 .Load the putty.exe , in the hostname tab mention the details as below

17. Go to connection tab and expand SSH then select Auth there is an option to brows and select the private key ( ppk) file which we saved earlier and then open
It will connect to the instance using the ssh client

1. Login to https://aws.amazon.com and sign in using the credentials as below

2. You will get a console as below which contains
multiple services available for AWS

1.
3. Click on EC2 and you will get the current status
of the instance . In this case no instances is running now

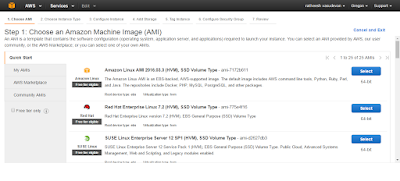
1. 4. Click Launch instance and select Redhat ( select
only eligible for free tier to avoid charges)

5. Here the choose instance type tab select the one
which is free tire eligible

6.Configure the instance details as below as
Number of instances 1
Purchasing option ( don’t enable request spot instances )
Network/subnet/Auto assign IP ( all these details will come
automatically)
Shutdown behaviour you can select as stop and tick enable
termination protection

7.Add storage details
(for free tier default storage size available will be 30GB)
(for free tier default storage size available will be 30GB)

8. 8. We can tag the instance as below, here I am giving the instance name as “webserver

9 Then we have an option to configure the security groups ( which means the firewall rules for specific ports need to be opened)

. 10 Click on review and launch ( all the above mentioned
configured options are available in this tab also this will allow you to edit
the configurations before you are launching the instance . Also there will be
an option to configure the key pair for security purpose which contains a
public and private key’s. Please mention any key name “ in this example I have
mentioned the key name as unixchips1. This key pair will be saved in your local
system for future use as a .pem file.


.
13. Once you click in connect option you will get below prompt which will describe the connection methods. There is 2 methods to access a linux instance, java enabled ssh method and standard putty method. Here I am using standard putty connect
13. Once you click in connect option you will get below prompt which will describe the connection methods. There is 2 methods to access a linux instance, java enabled ssh method and standard putty method. Here I am using standard putty connect

14 Also you need to download “puttygen”( http://www.chiark.greenend.org.uk/~sgtatham/putty/download.html) before connecting using putty to configure public & private key for the instance
Launch putty gen and click on “load” option , select all files from the drop down list and locate the .pem file ( unixchips1.pem) which we saved earlier . If correct file is located you will get a message as below .


15. There is an option to save the private key (.ppk) format and save that in your desktop. Here I have saved as unixchips1.ppk in my desktop
16 .Load the putty.exe , in the hostname tab mention the details as below
where ec2-user is the default username while creating each
instance and the other one is public DNS name of the server .

17. Go to connection tab and expand SSH then select Auth there is an option to brows and select the private key ( ppk) file which we saved earlier and then open
It will connect to the instance using the ssh client

Very important points you cleared here, Gmail Technical Support Canada 1-888-414-1732 is available for your help and support 24x7, to fix your gmail account issues.
ReplyDeleteVery useful information provided by you. Keep share and update AWS Online Training
ReplyDelete