Showing posts with label kubernetes. Show all posts

Monday, August 7, 2023

Vulnerability assessment in kubernetes using Kube bench


Kube-Bench is an open-source tool developed by Aqua Security that helps you check the security configuration of Kubernetes clusters. It automates the process of auditing a Kubernetes cluster against the Center for Internet Security (CIS) Kubernetes Benchmark. The CIS Kubernetes Benchmark is a set of best practices and security recommendations to secure Kubernetes deployments.

Kube-Bench is widely used by system administrators, security professionals, and anyone responsible for the security and compliance of Kubernetes environments. It assesses the security posture of a cluster by running a series of tests based on the CIS Kubernetes Benchmark and provides a detailed report highlighting any potential security misconfigurations or vulnerabilities.

Basic functionality of the kube bench is explaining below 


  • Scanning Kubernetes Cluster: Kube-Bench connects to the Kubernetes API server and performs a series of checks against the cluster's configuration and settings.


  • CIS Benchmark Tests: The tool runs a set of checks based on the CIS Kubernetes Benchmark. The benchmark consists of various security recommendations categorized into different sections, such as control plane configuration, node security, network policies, etc.


  • Generating Reports: After scanning the cluster, Kube-Bench generates a comprehensive report detailing the results of each check. The report indicates whether each security check has passed or failed, along with additional information and recommendations.


  • Remediation: Based on the report generated by Kube-Bench, administrators can take necessary actions to address any security issues and misconfigurations identified during the scan.

Let's install and configure kube bench in a sample kubernetes cluster 


Install Kube-Bench:

We can install Kube-Bench using various methods, such as downloading the binary from the GitHub releases page or using a package manager. Here's an example of installing it using curl and bash

#curl -L https://github.com/aquasecurity/kube-bench/releases/latest/download/kube-bench | sudo tee /usr/local/bin/kube-bench > /dev/null sudo 
#chmod +x /usr/local/bin/kube-bench

Run Kube-Bench against your Kubernetes cluster. You'll need the kubeconfig file to authenticate with the cluster. Replace path/to/your/kubeconfig.yaml with the actual path to your kubeconfig file: The default location of the kubeconfig file will be $Home/.kube/config

# kube-bench -c path/to/your/kubeconfig.yaml

Once this command it executed we will get the result as below 


********************************************************************************
[INFO] 1 Master Node Security Configuration
   [INFO] 1.1 API Server
     [PASS] 1.1.1 Ensure that the --allow-privileged argument is set to false (Scored)
     [PASS] 1.1.2 Ensure that the --anonymous-auth argument is set to false (Scored)
     [FAIL] 1.1.3 Ensure that the --basic-auth-file argument is not set (Scored)
     [PASS] 1.1.4 Ensure that the --insecure-allow-any-token argument is set to false (Scored)
     ...

   [INFO] 1.2 Controller Manager
     [PASS] 1.2.1 Ensure that the --terminated-pod-gc-threshold argument is set as appropriate (Scored)
     [PASS] 1.2.2 Ensure that the --profiling argument is set to false (Scored)
     ...

[INFO] 2 Node Security Configuration
   [INFO] 2.1 Kubelet
     [PASS] 2.1.1 Ensure that the --anonymous-auth argument is set to false (Scored)
     [PASS] 2.1.2 Ensure that the --authorization-mode argument is not set to AlwaysAllow (Scored)
     [PASS] 2.1.3 Ensure that the --protect-kernel-defaults argument is set to true (Scored)
     ...

   [INFO] 2.2 Docker
     [PASS] 2.2.1 Ensure that the version of Docker is up to date (Scored)
     [PASS] 2.2.2 Ensure that the Docker daemon is configured to drop Linux capabilities (Scored)
     ...

[INFO] 3 ETCD Security Configuration
   [PASS] 3.1 Ensure that the --cert-file and --key-file arguments are set as appropriate (Scored)
   [PASS] 3.2 Ensure that the --client-cert-auth argument is set to true (Scored)
   ...

[INFO] 4 Policies
   [INFO] 4.1 Pod Security Policies
     [PASS] 4.1.1 Ensure that a PodSecurityPolicy (PSP) is created (Scored)
     [PASS] 4.1.2 Ensure that the PSP controller is deployed (Scored)
     ...

   [INFO] 4.2 Network Policies
     [PASS] 4.2.1 Ensure that Calico network policy plugin is deployed (Scored)
     [PASS] 4.2.2 Ensure that 'NetworkPolicy' is set as the default network policy provider (Scored)
     ...

[INFO] 5 Logging and Monitoring
   [PASS] 5.1 Ensure that audit policies are configured (Scored)
   [PASS] 5.2 Ensure that the audit policy covers key security concerns (Scored)
   ...

==============================================================
|                     Summary Report                         |
==============================================================
|    Passing  |      74    |         |    Not Passing  |    4    |
==============================================================

****************************************************************************


In this sample report:

Each section (e.g., Master Node Security Configuration, Node Security Configuration, etc.) corresponds to a specific area of security checks.
Within each section, there are individual checks with their results (PASS, FAIL, WARN, etc.).
The summary at the end provides a count of passing and failing checks.

Remember that Kube-Bench is a tool for auditing and checking your cluster's security configuration. It doesn't fix any identified issues automatically. You will need to manually adjust your cluster's configuration based on the recommendations provided.

Sunday, July 30, 2023

Disaster Recovery ( DR ) Strategies in Kubernetes


Kubernetes is one of the powerful container management orchestration technology which is developed by Google (GKE). But Kubernetes itself does not provide any built in DR strategies , so let us check the best practices followed in industry as a part of DR.


1. Multi-Cluster Deployment: Deploying your applications across multiple Kubernetes clusters in different geographical regions or data centers can ensure higher availability in case of a disaster in one location. 

2. Backup and Restore: Regularly backing up your Kubernetes resources (e.g., manifests, configurations, secrets) and application data can aid in restoring the cluster to a previous state in the event of data loss or cluster failure.

3. Replication and High Availability: Use Kubernetes features like replicas and Deployments to ensure that critical applications have multiple instances running across different nodes to tolerate node or pod failures.

4. Namespace Isolation: Isolate applications with different levels of criticality into separate namespaces, allowing you to manage disaster recovery for each namespace independently.

5. Etcd Data Backup: Etcd is the distributed key-value store used by Kubernetes to store cluster state. Regularly backing up the Etcd data is crucial for disaster recovery, as restoring Etcd can bring your cluster back to a functional state.

6. Disaster Recovery Testing: Regularly test your disaster recovery procedures to ensure they work as expected and to identify any potential issues before a real disaster occurs.

7. Provider-Specific Tools: Some cloud providers offer their disaster recovery solutions tailored for Kubernetes deployments. These tools might provide automated backup and recovery processes.

8. Stateful Application Replication: For stateful applications, consider using mechanisms like database replication or distributed storage systems to ensure data availability across multiple nodes.

9. Disaster Recovery Policies: Establish clear policies and procedures for handling disaster recovery scenarios, including communication plans, roles and responsibilities, and escalation processes.

10. External Monitoring and Health Checks: Implement monitoring and health checks for your Kubernetes clusters and applications to quickly detect issues and initiate recovery processes.


Now let us check some of the external  tools using for kubernetes DR 

Kubernetes DR Tools 

Velero : Velero is an open-source tool that facilitates backup and restore operations for Kubernetes clusters and their resources. Formerly known as Heptio Ark, Velero was initially developed by Heptio (now part of VMware) to address the need for a robust and efficient backup solution for Kubernetes. The project was later donated to the Cloud Native Computing Foundation (CNCF) and has since gained popularity and community support.

Velero helps Kubernetes users to perform reliable backups of cluster resources, including persistent volumes, namespaces, configurations, and other critical objects. With Velero, you can create backups of your entire cluster or specific resources and restore them in case of data loss, cluster failure, or other disaster scenarios.

Restic : Restic is designed to efficiently and securely back up data to various types of storage targets, such as local disk, network-attached storage (NAS), cloud storage services like Amazon S3, Google Cloud Storage, or any other SFTP (SSH File Transfer Protocol) server that supports the SFTP or REST protocol.

While Restic itself is not tightly integrated with Kubernetes like Velero (formerly Heptio Ark), it can be used in conjunction with Kubernetes to back up and restore the data of your applications running on the cluster. Many Kubernetes users opt to use Restic for backing up the data inside the Kubernetes persistent volumes, which store the application data that needs to be retained beyond the lifespan of individual pods.

Kube-bench : Kube-Bench is an open-source tool developed by Aqua Security that helps you check the security configuration of Kubernetes clusters. It automates the process of auditing a Kubernetes cluster against the Center for Internet Security (CIS) Kubernetes Benchmark. The CIS Kubernetes Benchmark is a set of best practices and security recommendations to secure Kubernetes deployments. Also this tool will help to configure DR strategies in kubernetes 

Conclusion :


During a DR test, the Kubernetes cluster is subjected to a simulated disaster or failure, and the recovery processes are tested to ensure that they are functioning correctly. This allows the cluster administrators to identify any weaknesses or issues in the recovery process, and to address them before a real disaster occurs.

It's essential to carefully plan and design your Kubernetes environment with disaster recovery in mind from the start. The actual strategies and tools you choose will depend on your specific requirements, budget, and infrastructure. Always keep in mind that disaster recovery is an ongoing process that requires regular reviews, testing, and adjustments as your applications and infrastructure evolve.


Tuesday, July 18, 2023

Security Contexts in Kubernetes

 In Kubernetes, a security context is a feature that allows you to set various security-related settings at the pod or container level. These settings define the operating system-level permissions and constraints for the containers running within a pod. Security contexts help enforce security policies and isolation within the cluster. Here are some common security settings you can configure using security contexts:


1. Run as a non-root user: By default, containers run as the root user inside the container. However, it's considered a security best practice to run containers as non-root users to limit the potential impact of any security vulnerabilities. You can specify a non-root user using the runAsUser field.

2. Run as a specific group: In addition to specifying a non-root user, you can also specify a specific group for the container to run as using the runAsGroup field.

3. File permissions: You can control the file permissions for files and directories created within the container using the fsGroup field. This ensures that any files created by the container have the correct ownership and permissions.

4. Linux capabilities: Linux capabilities are a way to grant certain privileged operations to a process running inside a container without running the entire container as a privileged user. You can specify the Linux capabilities required by a container using the capabilities field.

5, Read-only file system: To enhance security, you can specify that the container's file system should be mounted as read-only. This prevents any modifications to the file system within the container. You can set the readOnlyRootFilesystem field to true to enforce a read-only file system.

6. Seccomp profiles: Seccomp (Secure Computing Mode) is a mechanism in the Linux kernel that allows you to restrict the system calls available to a process. You can specify a seccomp profile to further limit the system calls available to containers using the seccompProfile field.

To configure security contexts in Kubernetes, you can define them in the pod or container specification. Here's an example of how to configure security contexts in a pod:

****************************************************************************

apiVersion: v1

kind: Pod

metadata:

  name: my-pod

spec:

  containers:

  - name: my-container

    image: my-image

    securityContext:

      runAsUser: 1000

      fsGroup: 2000

      capabilities:

        add: ["NET_ADMIN"]

      readOnlyRootFilesystem: true

********************************************************************************

In this example, the my-container container will run as the user with UID 1000, any files created will have the group ID 2000, the NET_ADMIN capability will be added to the container, and the container's file system will be mounted as read-only.


Wednesday, June 16, 2021

Kubernetes troubleshooting diagram

Here i am providing a detailed flow chart about the kubernetes troubleshooting scenarios


1. As per the above diagram first we have to check whether the pods are in pending state or not  using the command 

PS /home/unixchips> kubectl get pods
NAME                           READY   STATUS    RESTARTS   AGE
webfrontend-5dc5464686-c7ncf   1/1     Running   0          18h
webfrontend-5dc5464686-ccrj2   1/1     Running   0          4d5h
webfrontend-5dc5464686-gjmwp   1/1     Running   0          18h

2. if the pods are in pending mode check the logs as below , so any error is related to the cluster status will be reflected on below output 

*********************************************************************
PS /home/unixchips> kubectl describe pod webfrontend-5dc5464686-c7ncf
Name:         webfrontend-5dc5464686-c7ncf
Namespace:    default
Priority:     0
Node:         aks-agentpool-54305753-vmss000000/10.240.0.4
Start Time:   Mon, 14 Jun 2021 19:29:16 +0000
Labels:       app.kubernetes.io/instance=webfrontend
              app.kubernetes.io/name=webfrontend
              pod-template-hash=5dc5464686
Annotations:  <none>
Status:       Running
IP:           10.240.0.107
IPs:
  IP:           10.240.0.107
Controlled By:  ReplicaSet/webfrontend-5dc5464686
Containers:
  webfrontend:
    Container ID:   containerd://9bba1ea0024a1e44d8d1d760985541365c48bc656e31214e06d7d68ae8905819
    Image:          unixchipsacr1.azurecr.io/webfrontend:v1
    Image ID:       unixchipsacr1.azurecr.io/webfrontend@sha256:156eeb3ef36728fbfb914591a852ab890c6eff297a463ef26d2781c373957f3e
Port:           80/TCP
    Host Port:      0/TCP
    State:          Running
      Started:      Mon, 14 Jun 2021 19:29:17 +0000
    Ready:          True
    Restart Count:  0
    Liveness:       http-get http://:http/ delay=0s timeout=1s period=10s #success=1 #failure=3
    Readiness:      http-get http://:http/ delay=0s timeout=1s period=10s #success=1 #failure=3
    Environment:    <none>
    Mounts:
      /var/run/secrets/kubernetes.io/serviceaccount from webfrontend-token-92dz6 (ro)
Conditions:
  Type              Status
  Initialized       True
  Ready             True
  ContainersReady   True
  PodScheduled      True
Volumes:
  webfrontend-token-92dz6:
    Type:        Secret (a volume populated by a Secret)
    SecretName:  webfrontend-token-92dz6
Optional:    false
QoS Class:       BestEffort
Node-Selectors:  <none>
Tolerations:     node.kubernetes.io/not-ready:NoExecute op=Exists for 300s
                 node.kubernetes.io/unreachable:NoExecute op=Exists for 300s
Events:          <none>

3. If the cluster is full and you want to increase the cluster size you can scale up the nodes manually using kubectl scale command as below 


if you want to add extra worker nodes to the existing cluster you can use the steps as below using kubeadm command 

sudo kubeadm join \ 192.168.122.195:6443 \ --token nx1jjq.u42y27ip3bhmj8vj \ --discovery-token-ca-cert-hash sha256:c6de85f6c862c0d58cc3d10fd199064ff25c4021b6e88475822d6163a25b4a6c

Detailed steps are given below 

https://computingforgeeks.com/join-new-kubernetes-worker-node-to-existing-cluster/

4. If the pods are not running or not in the pending state we may need to check the application related logs . if the ports are not listening correctly or any application related issues should be reflected here .. 

PS /home/unixchips> kubectl logs webfrontend-5dc5464686-c7ncf
Listening on port 80

PS /home/unixchips> kubectl logs webfrontend-5dc5464686-ccrj2 --previous
Error from server (BadRequest): previous terminated container "webfrontend" in pod "webfrontend-5dc5464686-ccrj2" not found

5. If the pods are not ready and the readiness probe failing we may need to increase the InitialDelaySeconds in the deployments.yml inside the /template folder for helm installation 


PS /home/unixchips> kubectl describe pod webfrontend-5dc5464686-c7ncf | grep -i readiness
    Readiness:      http-get http://:http/ delay=0s timeout=1s period=10s #success=1 #failure=3

ports:
            - name: http
              containerPort: 80
              protocol: TCP
          livenessProbe:
            httpGet:
              path: /
              port: http
          readinessProbe:
            httpGet:
              path: /
              port: http
             InitialDelayseconds: 20


6. If "kubectl describe  webfrontend-5dc5464686-c7ncf" will give error related to quota limits we have to increase the quota limits by updating the limit range config for the pod's 

**********************************************
apiVersion: v1
kind: LimitRange
metadata:
  name: webfrontend-limit
spec:
  limits:
  - max:
      memory: 1Gi
    min:
      memory: 500Mi
    type: Container

******************************************************
apply the same as below 
kubectl apply -f limitrange.yml 
more details are given in below link 
https://kubernetes.io/docs/tasks/administer-cluster/manage-resources/quota-memory-cpu-namespace/

7. Errors related to  image's .. most of the cases when the image pulled is not correct we used to get the error as "ImagePullBackoff" while we giving the command "kubectl get pods"

This is due to issues with image names mismatch or image pull policy issues or even issue with credentials of a private registry 

for example if we check the below pod status it is showing as errorimage pull & imahepullbackoff 


if we check the logs it is showing as
 
PS /home/unixchips/dev-spaces/samples/nodejs/getting-started/webfrontend/webfrontend> kubectl logs webfrontend-8485955f44-8fjsl Error from server (BadRequest): container "webfrontend" in pod "webfrontend-8485955f44-8fjsl" is waiting to start: trying and failing to pullimage

if we check more details using kubectl describe pod webfrontend-8485955f44-8fjsl

Warning  Failed   69m (x4 over 71m)    kubelet  Failed to pull image "unixchipsacr1.azurecr.io/webfronten:v1": [rpc error: code = NotFound desc = failed to pull and unpack image "unixchipsacr1.azurecr.io/webfronten:v1": failed to resolve reference "unixchipsacr1.azurecr.io/webfronten:v1": unixchipsacr1.azurecr.io/webfronten:v1: not found, rpc error: code = Unknown desc = failed to pull and unpack image "unixchipsacr1.azurecr.io/webfronten:v1": failed to resolve reference "unixchipsacr1.azurecr.io/webfronten:v1": failed to authorize: failed to fetch anonymous token: unexpected status: 401 Unauthorized]
  Warning  Failed   69m (x4 over 71m)    kubelet  Error: ErrImagePull
  Normal   BackOff  16m (x242 over 71m)  kubelet  Back-off pulling image "unixchipsacr1.azurecr.io/webfronten:v1"
  Warning  Failed   76s (x308 over 71m)  kubelet  Error: ImagePullBackOff


we can see that from the image name it is not correct and due to that pods are not coming up ..

so image file name is not correct as there is one "d" is missing in the webfrontend .. so thats couse the issue and we have to change the deployment.yml file 

many more issues need to be  highlighted in this chart and i will project the same in later blogs 

thank you for the reading .. stay tuned ..


Friday, June 11, 2021

Deploy Azure Kubernetes Service ( AKS) with helm

 What is Helm ..

Helm is an opensource tool which help us to manage complex kubernetes applications . Also it will act as a package manager for kubernetes which help us to install,upgrade remove packages with in the kubernetes cluster. We can say helm is same as yum for Redhat linux and apt for ubundu . 

Why we have to use Helm

Writing and maintaining Kubernetes YAML manifests for all the required Kubernetes objects can be a time consuming and tedious task. For the simplest of deployments, you would need at least 3 YAML manifests with duplicated and hardcoded values. Helm simplifies this process and creates a single package that can be advertised to your cluster.

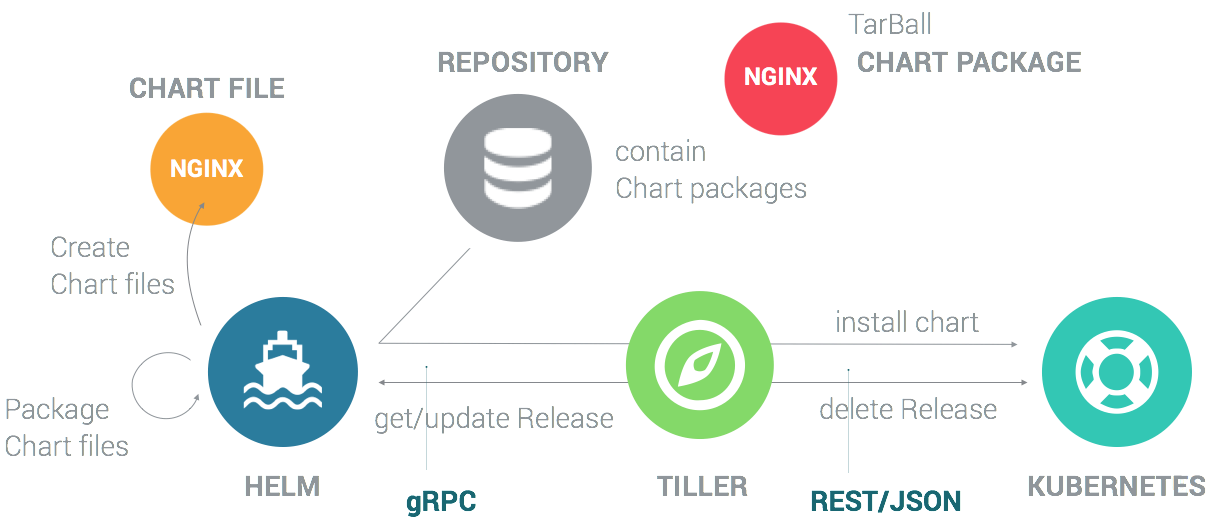
   Helm 2 is a client server model where the server called " tiller" is using to listen the requests from the helm client and pass it to the kubernetes cluster 


But in the helm 3 version the tiller component is removed and the helm client will directly communicative with the kubernetes cluster .


Helm contains mainly three components as below 

Chart - This is  a bundle of information necessary to create the instance of a kubernetes application
Config - The config contains configuration information which can be merged with chart to create a release object
Release - This is a running instance of a chart with specific config

A helm chart structure will be as below 

YOUR-CHART-NAME/
helmignore -> includes all the files which need to be ignored on chart 
 | 
 Chart.yaml -> all the information about your chart you are packaging
 | 
 values.yaml-> all the values need to be injected to the template
 | 
 charts/ -> This is the place where we will keep other chart details which is using in the main chart
 |
 templates/ This folder is where you put the actual manifest you are deploying with the chart. 
 For example you might be deploying an nginx deployment that needs a service, configmap and  secrets.  You will have your deployment.yaml, service.yaml, config.yaml and secrets.yaml all in the template dir. They will all get their values from values.yaml from above.

Now let's configure the Azure Kubernetes cluster with helm . Below are prerequisites needed for configuration 

Azure Cli installed in the local machine and Helm also installed locally . As i am configuring using the azure cloud shell helm is installed as default .

Type helm version 


Installing ACR ( Azure Container Registery) 

We need to create ACR for storing the images to run the applications using helm in AKS . So let's create  ACR named as unixchipsacr using below command 

az acr create --resource-group unixchipsrg1 --name unixchipsacr1 --sku basic


Creating AKS 


Next step is we have to create the AKS and attach the ACR . I am proceeding this task using portal as i am getting some error related to quota while using the cli method . You can refer the steps on my previous blog about creating the AKS using azure portal 

http://unixchips.blogspot.com/2019/07/azure-kubernetes-service-aks.html


To connect to this cluster using kubectl we have to get the credentials of the cluster unixchipsaks and same will be stored in /home/unixchips/.kube/config


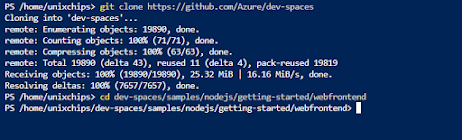
We have to clone the application from the GIT and navigate to the application directory 


Next step is to create a docker file as below 


We have to build and push the sample application to ACR 


Now we have to create the helm chart as below  we can see webfrontend directory is created under
the GIT repository downloaded locally and we can see helm structure under that webfrontend directory


We have to update the values.yml with the login server details of ACR which we created and change the service type as load balancer as below . We will get the login server details from the ACR portal


replicaCount: 1

image:
  repository: unixchipsacr1.azurecr.io/webfrontend
  pullPolicy: IfNotPresent
  # Overrides the image tag whose default is the chart appVersion.
  tag: ""

------------------output is omitted ---------------

service:
  type: LoadBalancer
  port: 80

*******************************************************

Install the helm chart as below 

helm install webfrontend webfrontend/


It takes a few minutes for the service to return a public IP address. Monitor progress using the kubectl get service command with the --watch argument.


If we try to access the application using external IP we can see the webpage as below 


So we have successfully configured the application using helm in AKS .

Thank you for reading and please post your comments 

Wednesday, June 19, 2019

Introduction to Kubernetes


What is kubernetes.

Kubernetes is a portable extensible opensource platform for managing centralised workloads and services which felicitates both declarative configuration and automation. It is one of the largely growing automation tool with a wide  support of  tools.

Kubernetes has wide range of features which includes

  • a container platform
  • a microservices platform
  • a portable cloud platform and a lot more.
K8s as a container platform 

Containers has unmatched benefits now a days which will act as a micro services with verity of security features. It is easy to manage if the number of containers are very less in the environment. But if the containers ate more or large scale in numbers we may need a container orchestration engine which is very helpful to deploy,destroy and scale the multiple containers in a quick way. K8s is first released in 2015 by Borg as a cluster management platform and later google was developed this tool as a container management platform. This is written in go language .

K8s as a microservices platform 

Kubernetes is an open source orchestrator for deploying containerised applications (microservices). It is also defined as a platform for creating, deploying and managing various distributed applications. These applications may be of different sizes and shapes. Kubernetes was originally developed by Google to deploy scalable, reliable systems in containers via application-oriented APIs. Kubernetes is suitable not only for Internet-scale companies but also for cloud-native companies, of all sizes.

K8s as a cloud platform

Kubernetes supports wide verity of cloud platforms like AWS,Azure, Google cloud to deploy applications . AWS has their own proprietary container orchestrator, Elastic Container Service (ECS), but it is different than Kubernetes.In AWS kubernetes operations (KOPS) is used to manage kubernetes . KOPS has below advantages 

  • Deploy HA Kubernetes master nodes
  • Upgrade Kubernetes master nodes
  • Upgrade, add, or remove worker nodes
  • kops is highly configurable
  • Supported by Codefresh
KOPS needs to be installed separately as it is not readily available in aws management console .

Google Container Engine (GKE) is Google Cloud Platform’s managed Kubernetes service.Google manages the Kubernetes master nodes for you in GKE, meaning that you don’t have access to them but you also aren’t charged for their compute resources.Another feature that sets GCP apart is that they provide a global spanning load balancer built-in which is autoconfigured when services are created.

  • Abstracts away and manages Kubernetes master nodes
  • Nodes use container optimized image
  • Upgrade Kubernetes Master through GCP management console
  • Upgrade, add, or remove worker nodes through GCP management console
  • Global spanning load balancer built-in
  • Easy deployment and automation
  • Optional support for Kops
  • Streamlined integration with Codefresh
In MS Azure we have built in service called Azure Container Service (ACS) to deploy kubernetes service.ACS acts as more of a deployment template since it does not include features to upgrade a cluster after it has been deployed. In order to upgrade clusters using ACS, you would need to use ACS to create a new cluster, migrate containers to it, and remove the old cluster.One bonus feature of Azure is that creating templates out of your infrastructure is very easy. Once you create and configure all your services you can essentially take a snapshot and deploy it again.
  • Deploy HA Kubernetes master nodes
  • Add or remove worker nodes through Azure management console
  • Supported by Codefresh
  • Save infrastructure definition

Kubernetes architecture 


Basic kunbernetes setup consist of two types of nodes Master and nodes.

Masters
------------
This type of node is responsible for cluster management, network allocation,
quota enforcement, synchronization, and communication. Master nodes act as the
main point of contact for clients—be it actual people or some external system. In
the simplest setup, there can be only one master, but highly available clusters
require at least two to prevent common fail situations. The most important service
that masters run is the API.

Nodes
------------
Nodes will have environment to host the docker containers ie it will provide the runtime environment for running pods.

K8 API provides number of components to use various mechanisms in K8 setup. I will explain some of them as below in high level

Namespaces: These resources serve the purpose of separating organizational
units of users and their projects in a multitenant environment. Moreover, they
are used for more fine-grained access control and quota enforcement. Almost all
Kubernetes resources, except Volumes and Namespaces themselves, are
namespaced, which means their names must be unique in any given namespace.

Pods: Pods represent a collection of containers and each pod serves as a basic
management unit in Kubernetes. All containers in a pod share the same storage
volumes and network.

Services: They represent an interface between clients and the actual application
running in pods. A service is an IP:port pair which forwards traffic to backend
pods in a round-robin fashion. Having a consistent address and port saves clients
having to keep up with any transient changes in the cluster.

Replication Controllers (RC): In a nutshell, these resources define how many
pods must be replicated. Their definitions include pod templates that describe
pods to be launched, and one of the parameters each RC contains is the number
of replicas to be maintained. If for some reason one or more of the pods go down,
Kubernetes will launch new ones to satisfy this number

Persistent Volumes (PV): These resources abstract actual physical storage
systems, be it NFS, iSCSI, or something else. Typically, they are created by a
cluster administrator and can be mounted inside a pod using the PVC binding
mechanism, which is mentioned later.

Persistent Volume Claims (PVC): PVC represents a request for storage
resources. Pod definitions don't use PVs directly; instead, they rely on binding
PVs to PVCs, performed by Kubernetes.

Secrets: Used for passing sensitive data such as keys, tokens, and passwords
inside pods.

Labels: Labels provide a mechanism for scoping a set of resources using
selectors. For example, services use selectors to specify what pods to forward
incoming traffic to. When new pods are started with the same label, they are
dynamically associated with the service that has their label specified as a selector
in its definition

From the services point of view kubernetes can be explained by number of services in detail

In masters
---------------
etcd : This is a distributed key-value configuration store that holds
all metadata and cluster resources. Due to its quorum model, you
are advised to run an uneven number of etcd nodes, starting from
three in a highly available setup.

kube-apiserver : Service that exposes the Kubernetes API to
clients. Its stateless nature enables it to be deployed in a highly
available configuration by scaling horizontally.

kube-scheduler : Component that governs the placement of
newly created pods on nodes. This procedure takes into account
such factors as hardware/policy limitations, data locality, and
affinity rules. It is worth noting that from the cluster point of view,
masters are no different from any other node and thus can be
eligible for running pods, although best practices suggest not
putting additional strain on master nodes and dedicating them
only to management functions.

kube-controller-manager : The component that runs various
controllers—some of them are replication controllers that maintain
the required number of running pods, node controllers for
discovering nodes that went down, a volume controller for binding
PVs to PVCs, and an endpoints controller that binds services and
pods together.

cloud-controller-manager : Service that provides integration
with underlying cloud providers, such as DigitalOcean and Oracle
Cloud Infrastructure.

In nodes
------------

kubelet: This service uses a pod specification to manage its pods
and conduct periodic health checks.

kubeproxy: This component implements service abstraction by
providing TCP and UDP forwarding capabilities across a set of
backend pods.

Container runtime environment: This component is represented
in Kubernetes by an underlying container technology. At the time
of writing, Kubernetes supports docker and rkt as runtimes


I will explain the installation and setup of kubernetes in another post

Thank you for reading