Wednesday, June 20, 2018

AWS-Autoscaling

Autoscaling is the mechanism to scale out EC2 instances seamlessly and automatically when demand increases. It also helps to increase the resource vertically like CPU/Memory etc. A.S will also increase the number of instances as per the requirement .

What is the purpose of Autoscaling 


  • Load on application varies 
  • A good design must take care of varying load 
  • Since load spike cannot be anticipated always, manual scaling is not the solution 
  • Other solution is to over provision resources 
  • This is inefficient and costly 
  • Auto scaling is the best solution for dealing with varying load  

The Autoscaling process 


Horizontal & Vertical scaling 


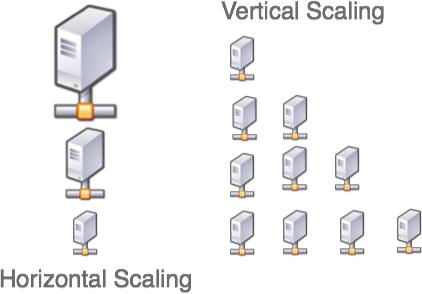
Horizontal scaling means that you scale by adding more machines into your pool of resources.
 
Vertical scaling means that you scale by adding more power (CPU, RAM) to your existing machine

Steps for Autoscaling configuration 


1. Login to AWS console  go to services and select Autoscaling 


2. Select the first option to create the launch configuration 


3. Select the AMI ( Amazone Machine Image) from the My AMI session which will be used to create the new instances . You can create the image from any existing EC2 instances ( Detailed steps for creating AMI's are mentioned in the Load balacer configuration session )


4. Select the type of instances from the next step 


5. Next step is to give the name for Launch configuration ( As i didn't configured any IAM roles i have kept it as blank and cloud watch detailed monitoring also)


6. Select the storage and security group as per the requirement ( i have enabled port 22 and 80 in the security group )


7. Review the Launch configuration settings and create it 


8. Create / select the Key pair 


9. Now we have successfully configured the launch configuration as below 


10 .Now let us start the autoscaling configuration , provide the AS name, VPC details ( default) and subnet details where the autoscaling instances need to be expanded 


11. We have to mention the target group which includes the information about the EC2 instances which is including the ASG . The health check grace period of the instances is mentioned as 300 sec


12. Configure the scaling policies and alarm as below ( Here when the average CPU utilisation is greater than or equal to 90 % for 2 consecutive period of 5 minuets , it will create a new instance )


13.Now review the settings and configure the auto scaling group


14. You can see 2 new instances are created with the autoscaling group tag and you can add any existing instances to the new autoscaling group also.


We have created a sample autoscaling setup ..


Thanks for reading the content and welcoming your valuable feedback 


Monday, June 18, 2018

Sample Cloudformation template and it's implementation in AWS

AWS cloud formation is a model that helps to design and implement the AWS services.We can create a template which describes the AWS resources which is needs to be build (ex: EC2 instances and RDS services ) and AWS cloud formation takes care of its implementation. Also we don't need to individually create and configure AWS resources and figure out what dependent on what , cloudformation will figure out that and implement it


AWS Cloudformation Structure 


1. Format version ( optional)

This describes AWS cloudformation version that the template confirms to

2. Description ( optional )

A text that describes the template , this will alays follow the template format version session

3. Parameters

Specifies the values that you are passing with the template at run time. (when you create or update the stack .

4. Mappings (optional)

Mappings of the  keys and its respective values are used to specify conditional parameter values. We can match a key to a corresponding value by using Fn::FindInMap function

5.Conditions

Defines conditions that control whether certain resources are created or whether
certain resource properties are assigned a value during stack creation or update. For
example, you could conditionally create a resource that depends on whether the
stack is for a production or test environment.

6. Resources

Specifies the stack resources and their properties, such as an Amazon Elastic
Compute Cloud instance or an Amazon Simple Storage Service bucket.

7. Outputs

Describes the values that are returned whenever you view your stack's properties.

Cloudformation template 

This cloud formation template will create a EC2 instance and add them to a new load balancer 


**********************************************************************

{"AWSTemplateFormatVersion" : "2010-09-09",

{

"Resources" : {
 
"EC2Instance" : {
   
"Type" : "AWS::EC2::Instance",
   
"Properties" : {
     
"SecurityGroups" : [ { "Ref" : "InstanceSecurityGroup" } ],
     
"KeyName" : "mykey",
     
"ImageId" : "ami-006b0447cf00d6804"
   
}
 
},

 
"InstanceSecurityGroup" : {
   
"Type" : "AWS::EC2::SecurityGroup",
   
"Properties" : {
     
"GroupDescription" : "Enable SSH access via port 22",
     
"SecurityGroupIngress" : [
       
{ "IpProtocol" : "tcp", "FromPort" : "22", "ToPort" : "22", "CidrIp" : "0.0.0.0/0" },
       
{ "IpProtocol" : "tcp", "FromPort" : "80", "ToPort" : "80", "CidrIp" : "0.0.0.0/0" }
     
]
   
}
 
},

 
"ElasticLoadBalancer" : {
   
"Type" : "AWS::ElasticLoadBalancing::LoadBalancer",
   
"Properties" : {
     
"AvailabilityZones" : { "Fn::GetAZs" : "" },
     
"Instances" : [ { "Ref" : "EC2Instance" } ],
     
"Listeners" : [ {
       
"LoadBalancerPort" : "80",
       
"InstancePort" : "80",
       
"Protocol" : "HTTP"
     
} ],
     
"HealthCheck" : {
         
"Target" : { "Fn::Join" : [ "", ["HTTP:", "80", "/"] ] },
       
"HealthyThreshold" : "3",
       
"UnhealthyThreshold" : "5",
       
"Interval" : "30",
       
"Timeout" : "5"
     
}
   
}
 
}

}
}
}

****************************************************************************

No let's upload the template to a stack and test

1. Select the cloudformation from the service list


2. Create the new stack and select the stack file which you have created above


3. Specify the stack name , in this case i have mentioned as unixchipstack


4. You can tag the stack for identification purpose


5. Once you review and upload the stack you can see new EC2 instance is created as below


If any error's in the stack template same can be highlighted in event tab and according to that e have to troubleshoot


Monday, June 11, 2018

Amazon VPC and its sample configuration

A virtual private cloud (VPC) is a virtual network which is similar to our traditional data center, but VPC supports the scalable  infrastructure resources of AWS. Amazone VPC allows you to use launch Amazone web services resources to a virtual network that you have defined . Also this will help you to created isolated networks for your applications or clients

The main components of the Amazon VPC is provided below

VPC: A virtual private cloud (VPC) is a virtual network dedicated to your AWS account. It is logically isolated from other virtual networks in the AWS cloud. You can launch your AWS resources, such as Amazon EC2 instances, into your VPC. You can configure your VPC; you can select its IP address range, create subnets, and configure route tables, network gateways, and security settings.

Subnet: A subnet is a range of IP addresses in your VPC. You can launch AWS resources into a subnet that you select. Use a public subnet for resources that must be connected to the Internet, and a private subnet for resources that won't be connected to the Internet.

Route Table: A route table contains a set of rules, called routes, that are used to determine where network traffic is directed.
Each subnet in your VPC must be associated with a route table; the table controls the routing for the subnet. A subnet can only be associated with one route table at a time, but you can associate multiple subnets with the same route table.

Internet Gateway: An Internet gateway is a horizontally scaled, redundant, and highly available VPC component that allows communication between instances in your VPC and the Internet. It therefore imposes no availability risks or bandwidth constraints on your network traffic.

Network ACLs: A network access control list (ACL) is an optional layer of security for your VPC that acts as a firewall for controlling traffic in and out of one or more subnets. You might set up network ACLs with rules similar to your security groups in order to add an additional layer of security to your VPC.


Different VPC scenarios

Scenario  Usage 
Scenario 1: VPC with a Single Public Subnet Your instances run in a private, isolated section of the AWS cloud with direct access to the Internet
Scenario 2: VPC with Public and Private Subnets (NAT) In addition to containing a public subnet, this configuration adds a private subnet whose instances are not addressable from the Internet. Instances in the private subnet can establish outbound connections to the Internet via the public subnet using Network Address Translation (NAT).
Scenario 3: VPC with Public and Private Subnets and Hardware VPN Access This configuration adds an IPsec Virtual Private Network (VPN) connection between your Amazon VPC and your data center - effectively extending your data center to the cloud while also providing direct access to the Internet for public subnet instances in your Amazon VPC.
Scenario 4: VPC with a Private Subnet Only and Hardware VPN Access Your instances run in a private, isolated section of the AWS cloud with a private subnet whose instances are not addressable from the Internet. You can connect this private subnet to your corporate data center via an IPsec Virtual Private Network (VPN) tunnel.


Steps for creating the VPC setup

1. Login to the AWS console and go to networking session and click on the VPC ( you can go to the EC2 session also and can see the VPC below that in left side bar as below), click on the create VPC and provide the VPC name (unixchipsVP) and IPV4 CIDR block range also (10.3.0.0/16)


2.  Once you create the VPC if you check the relative components of these you can see one route table is created along with a network ACL, and a security group also


3. Let's create the public subnet with an understandable naming convention as 10.3.0.0-ap-aouth-1a_public, select the VPC as unixchipsVP and associate the CIDR range as 10.3.0.0/16 (sample configuration is below)


4. Create the private subnet as below , name should be 10.3.2.0-ap-south-1b-private and the CIDR range will be 10.3.2.0/24


5. Now we have to create the internet gateway and attach the same to VPC as below


6. Configure the route table to provide the access to the internet gateway


7. Select the subnet assosiations from the down tab and associate the public subnet with that


8. Now in the public subnet we need a public ip to be auto assigned
Go to subnet – select the public subnet- subnet actions- modify autoassign ip settings


9. Create the instances in public and private subnet ( make sure you are using seperate security groups for both )

Instance settings are given below

Settings for Public


Settings for private


Also make sure you are configuring the inbound rules of the private instance security group as as custom and the network range should be 10.3.0.0/16


10 . Now connect to the public instance and from there try to access the private instance and you should be able to access as below


To ssh to the private instance , copy the .pem file attached to your public webserver and provide the ownership as 400 and connect as below


Ok now you have created the VPC and logged in to the attached instances , now we have to attach a NAT instance with that and that i will explain in other session .

Thanks for sharing the feed back