A virtual private cloud (VPC) is a virtual network which is similar to our traditional data center, but VPC supports the scalable infrastructure resources of AWS. Amazone VPC allows you to use launch Amazone web services resources to a virtual network that you have defined . Also this will help you to created isolated networks for your applications or clients
The main components of the Amazon VPC is provided below
VPC: A virtual private cloud (VPC) is a virtual network dedicated to your AWS account. It is logically isolated from other virtual networks in the AWS cloud. You can launch your AWS resources, such as Amazon EC2 instances, into your VPC. You can configure your VPC; you can select its IP address range, create subnets, and configure route tables, network gateways, and security settings.
Subnet: A subnet is a range of IP addresses in your VPC. You can launch AWS resources into a subnet that you select. Use a public subnet for resources that must be connected to the Internet, and a private subnet for resources that won't be connected to the Internet.
Route Table: A route table contains a set of rules, called routes, that are used to determine where network traffic is directed.
Each subnet in your VPC must be associated with a route table; the table controls the routing for the subnet. A subnet can only be associated with one route table at a time, but you can associate multiple subnets with the same route table.
Internet Gateway: An Internet gateway is a horizontally scaled, redundant, and highly available VPC component that allows communication between instances in your VPC and the Internet. It therefore imposes no availability risks or bandwidth constraints on your network traffic.
Network ACLs: A network access control list (ACL) is an optional layer of security for your VPC that acts as a firewall for controlling traffic in and out of one or more subnets. You might set up network ACLs with rules similar to your security groups in order to add an additional layer of security to your VPC.
Different VPC scenarios

Steps for creating the VPC setup
1. Login to the AWS console and go to networking session and click on the VPC ( you can go to the EC2 session also and can see the VPC below that in left side bar as below), click on the create VPC and provide the VPC name (unixchipsVP) and IPV4 CIDR block range also (10.3.0.0/16)

2. Once you create the VPC if you check the relative components of these you can see one route table is created along with a network ACL, and a security group also


3. Let's create the public subnet with an understandable naming convention as 10.3.0.0-ap-aouth-1a_public, select the VPC as unixchipsVP and associate the CIDR range as 10.3.0.0/16 (sample configuration is below)


4. Create the private subnet as below , name should be 10.3.2.0-ap-south-1b-private and the CIDR range will be 10.3.2.0/24


5. Now we have to create the internet gateway and attach the same to VPC as below


6. Configure the route table to provide the access to the internet gateway


7. Select the subnet assosiations from the down tab and associate the public subnet with that

8. Now in the public subnet we need a public ip to be auto assigned

9. Create the instances in public and private subnet ( make sure you are using seperate security groups for both )
Instance settings are given below
Settings for Public

Settings for private

Also make sure you are configuring the inbound rules of the private instance security group as as custom and the network range should be 10.3.0.0/16

10 . Now connect to the public instance and from there try to access the private instance and you should be able to access as below

Ok now you have created the VPC and logged in to the attached instances , now we have to attach a NAT instance with that and that i will explain in other session .
Thanks for sharing the feed back
The main components of the Amazon VPC is provided below
VPC: A virtual private cloud (VPC) is a virtual network dedicated to your AWS account. It is logically isolated from other virtual networks in the AWS cloud. You can launch your AWS resources, such as Amazon EC2 instances, into your VPC. You can configure your VPC; you can select its IP address range, create subnets, and configure route tables, network gateways, and security settings.
Subnet: A subnet is a range of IP addresses in your VPC. You can launch AWS resources into a subnet that you select. Use a public subnet for resources that must be connected to the Internet, and a private subnet for resources that won't be connected to the Internet.
Route Table: A route table contains a set of rules, called routes, that are used to determine where network traffic is directed.
Each subnet in your VPC must be associated with a route table; the table controls the routing for the subnet. A subnet can only be associated with one route table at a time, but you can associate multiple subnets with the same route table.
Internet Gateway: An Internet gateway is a horizontally scaled, redundant, and highly available VPC component that allows communication between instances in your VPC and the Internet. It therefore imposes no availability risks or bandwidth constraints on your network traffic.
Network ACLs: A network access control list (ACL) is an optional layer of security for your VPC that acts as a firewall for controlling traffic in and out of one or more subnets. You might set up network ACLs with rules similar to your security groups in order to add an additional layer of security to your VPC.
Different VPC scenarios
| Scenario | Usage |
| Scenario 1: VPC with a Single Public Subnet | Your instances run in a private, isolated section of the AWS cloud with direct access to the Internet |
| Scenario 2: VPC with Public and Private Subnets (NAT) | In addition to containing a public subnet, this configuration adds a private subnet whose instances are not addressable from the Internet. Instances in the private subnet can establish outbound connections to the Internet via the public subnet using Network Address Translation (NAT). |
| Scenario 3: VPC with Public and Private Subnets and Hardware VPN Access | This configuration adds an IPsec Virtual Private Network (VPN) connection between your Amazon VPC and your data center - effectively extending your data center to the cloud while also providing direct access to the Internet for public subnet instances in your Amazon VPC. |
| Scenario 4: VPC with a Private Subnet Only and Hardware VPN Access | Your
instances run in a private, isolated section of the AWS cloud with a private
subnet whose instances are not addressable from the Internet. You can connect
this private subnet to your corporate data center via an IPsec Virtual
Private Network (VPN) tunnel. |

Steps for creating the VPC setup
1. Login to the AWS console and go to networking session and click on the VPC ( you can go to the EC2 session also and can see the VPC below that in left side bar as below), click on the create VPC and provide the VPC name (unixchipsVP) and IPV4 CIDR block range also (10.3.0.0/16)

2. Once you create the VPC if you check the relative components of these you can see one route table is created along with a network ACL, and a security group also


3. Let's create the public subnet with an understandable naming convention as 10.3.0.0-ap-aouth-1a_public, select the VPC as unixchipsVP and associate the CIDR range as 10.3.0.0/16 (sample configuration is below)


4. Create the private subnet as below , name should be 10.3.2.0-ap-south-1b-private and the CIDR range will be 10.3.2.0/24


5. Now we have to create the internet gateway and attach the same to VPC as below


6. Configure the route table to provide the access to the internet gateway


7. Select the subnet assosiations from the down tab and associate the public subnet with that

8. Now in the public subnet we need a public ip to be auto assigned
Go to subnet – select the public subnet- subnet actions-
modify autoassign ip settings

9. Create the instances in public and private subnet ( make sure you are using seperate security groups for both )
Instance settings are given below
Settings for Public

Settings for private

Also make sure you are configuring the inbound rules of the private instance security group as as custom and the network range should be 10.3.0.0/16

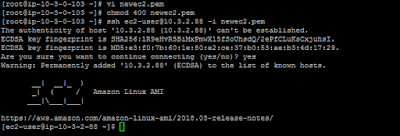
10 . Now connect to the public instance and from there try to access the private instance and you should be able to access as below

To ssh to the private instance , copy the .pem file attached
to your public webserver and provide the ownership as 400 and connect as below

Ok now you have created the VPC and logged in to the attached instances , now we have to attach a NAT instance with that and that i will explain in other session .
Thanks for sharing the feed back
Very nice! This information is useful to users, keep update and share AWS Online Training
ReplyDelete