What is an azure pipeline
Azure pipeline automatically builds, tests the codes and makes them available to others. In a conventional SDLC environment we have to manually test the code in different environment before getting it to the production. But in azure pipe line everything will be done automatically with the pipe line . Azure pipe line has two parts CI ( Continues Integration ) and CD ( continues deployment) .
Continues Integration is the practice used by the development teams to merge and test the code. This will help us to fix the bugs in the early stage and move on .Continuous Delivery (CD) is a process by which code is built, tested, and deployed to one or more test and production environments.CI systems produce the deployable artifacts including infrastructure and apps. Automated release processes consume these artifacts to release new versions and fixes to existing systems. Monitoring and alerting systems run continually to drive visibility into the entire CD process
Next thing is the version control systems. The starting to configure the CI CD pipe line is pushing the source code the version control systems like GIT, Bit bucket etc. Each changes in the code will be committed as different versions in the version control system and pushed to the pipe line for CI CD process.
Languages : Azure pipe line can accommodate most of the languages like java, .net, python, nodeJS, C++, Go etc.
Deployment Targets: We can deploy the code in many components using azure pipeline like VM's, containers, on permises and cloud platforms.Once you have continuous integration in place, the next step is to create a release definition to automate the deployment of your application to one or more environments
Continues Testing: Continues testing in the devops server help us to maintain the quality of the code after each changes we are performing in the code. Rich and actionable reporting felicities which is included in the pipeline help us identify the errors and solve it before committing the changes . Also we can use package formats like NuGet, npm, or Maven packages to the built-in package management repository in Azure Pipelines.
The basic things which we needed for azure pipeline is
- An organization in Azure DevOps.
- To have your source code stored in a version control system.
The basic architecture of the azure devops pipeline is given below

Now Let's create the first pipe line . We are choosing python language as the code for this pipe line
1. Login to the GIT and fork the below repository in your account ( you can see the for button at top right corner of the GIT
https://github.com/rathishvd/python-flask-azure-devops

2. Next step is to create the azure devops organisation as below and create the project . We have created a project called "flask-webapp"

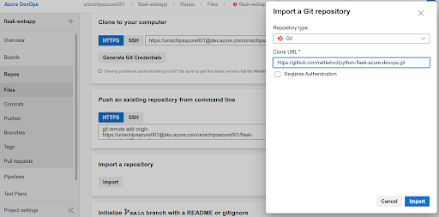
3. Once we will click the create pipeline option it will ask the repository details and once we login with the GIT credentials we have to choose the correct repository

4. Now let us import the repository as below from the GIT HUB

5. Let us import the repository as blow
Once the code is imported we have below file layout available in azure repo

6. Next let us create a new pipe line as below , select pipeline- new pipeline and classic view

7. Add a new agent job and select python version as below


8. Next step is add command line tools and install the dependencies


9. Execute the tests as below ..
Add Command line task as above
- Enter below details
- Display name: Pytest
- Script: pip install pytest && pytest Tests/unit_tests –junitxml=../TestResults/test-results.xml && pip install pycmd && py.cleanup Tests/

10. Next step is publich the test results by adding the same

11. Add archive file task to add the application
- Display name: Archive application
- Root folder or file to archive: $(System.DefaultWorkingDirectory)/Application
- Archive file to create: $(Build.ArtifactStagingDirectory)/Application$(Build.BuildId).zip

12 . Add another archive files tasks as below and fill the details as below
- Display name: Archive tests
- Root folder or file to archive: $(System.DefaultWorkingDirectory)/Tests
- Archive file to create: $(Build.ArtifactStagingDirectory)/Tests$(Build.BuildId).zip

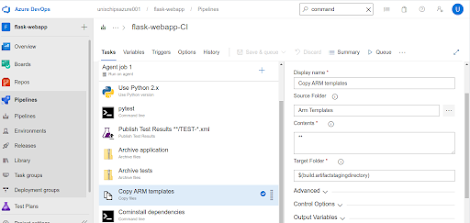
13. Next step is copy ARM templates
- Display name: Copy ARM templates
- Source Folder: ArmTemplates
- Target Folder: $(build.artifactstagingdirectory)
14. Add publish artifacts as below

15 . Now we have to save and run the CI build as below ...

16. Next step is configuring the continues intergration ( CI ) part
Login to Azure portal and and create a resource group first called " flask-webapp-rg"

17. Select an Empty Job and crate a release pipe line


18. Give the stage name as Dev ..


19. Next step is to provision azure webapps as below ..


Go back to release defenition and refresh the subescription

Add the below details on the task and install the python extension ..
- Location: South Central US
- Template: $(System.DefaultWorkingDirectory)/**/windows-webapp-template.json
- Override template parameters: -webAppName python-flask-mur -hostingPlanName python-flask-mur-plan -appInsightsLocation “South Central US” -sku “S1 Standard” (NOTE – REPLACE PYTHON-FLASK-MUR with your UNIQUE APP NAME)

Install azure python extension in azure app service manager task

Deploy the application in webapp with below datails..
- Connection type: Azure Resource Manager
- Azure Subscription: python-flask-devops
- App Service type: Web App on Windows
- App Service name: python-flask-mur ENTER YOUR UNIQUE APP NAME CONFIGURED IN PREVIOUS STEP
- Package or folder: $(System.DefaultWorkingDirectory)\**\Application*.zip


Post deployment session need to be configured as below
- Deployment script type: Inline Script
- Inline Script: @echo off
echo Installing dependencies
call “D:\home\python353x86/python.exe” -m pip install -U setuptools
if %errorlevel% NEQ 0 (
echo Failed to install setuptools >&2
EXIT /b 1
)


