Saturday, August 25, 2018

Creating an Elastic load balancer in AWS


Elastic load balancing service allows to distribute traffic across a group of amazon EC2 instances in one or more availability zones which help us to achieve high availability  in applications


  • Elastic Load Balancing automatically distributes incoming application traffic across multiple Amazon EC2 instances.


  • Elastic Load Balancing supports routing and load balancing of Hypertext Transfer Protocol (HTTP), Hypertext Transfer Protocol Secure (HTTPS), Transmission Control Protocol (TCP), and Secure Sockets Layer (SSL) traffic to Amazon EC2 instances.

Elastic load balances are 2 types Application load balancers and network load balancers ( there is one more type called classic load balancers which is treated as a previous generation by amazon, the main difference of application and network load balancers is the first one works at layer 7 in OSI model where the second one works at layer 4

Application Load  balancers

  • Uses Layer 7 in OSI model and can load balance http/https requests 
  • ALB supports https protocol and this help us to manage SSL certificates through AWS idendity management service (IAM) and certificate management service 
  • Uses SNI ( Server Name Indication) which is an extension of the TLS protocol which a client indicates hostname to connect to the start of the TLS handshake.This also supports smart certificate option where the certificate manager checks the hostname of the client with multiple  certificates and select the best one
  • We can load balance any application hosted in AWS or any other on premises using ipaddress of tha application backends as targets 
  • Application load balance requires to specify more than one availability zone which improves the high availability . 

Network Load balancing 

  • Connection based load balancing where you can route traffic to multiple services using TCP protocol 
  • Used to have high availability with in same availability zone . This offers traffic to only healthy targets and will cut the traffic if they found any target is unhealthy
  • Network load balancing is using where we need low latency and high throughput 
  • It supports static ip addresses which will be used in front end of the load balancer for the applications 
  • It also supports elastic IP per availability zone
I am providing the steps here to configure network load balancer in AWS 


1. First let's have two instances ready which can be used as targets for ELB


2. Login to the instances and make sure httpd service is running and have the index.html is configured inside the /var/www/html


3. Now select the load balancer option from resources and we can see the different ELB options as below


4. Provide the ELB name and select the option as internet facing from the configure loadbalancer tab ( also select the Listerners as TCP 80)


5. Select the availability zone as below  ( you can configure different availability zone as per the region )


6. Create the target group in configure routing tab as below


7. Also configure the health check details of the targets as below


8. Register the targets which are the EC2 instances configured earlier as below


9. Review the settings and create the load balancer


10. If we copy and paste the DNS name url of the load balancer which is given in the details of the ELB configuration in browser we can see the message ( the message configured in index.html)


11. To test the functionality let us stop the httpd process and make the target as unhealthy weshould get the response from other node without any interception


A sample configuration of the Elastic load balancing is ready in your setup

Thank you for reading ..

Tuesday, August 21, 2018

Docker management Part-2


Docker management


1. To check any containers running inside the docker use docker ps command


2. To get the currently running and stopped containers


3. To run a container image


4. To get the logs of a container with container ID


5. To login inside the docker use below command


6. To push the images in custom path in your docker server use below command


7 . If we login to the docker hub using web we can see the image as below


8. To run the docker image on background ,


This command will generate a random ID where the first 12 characters are the docker ID

9. Use the docker ps command to verify the docker ID and status


 Now we can execute commands inside the docker 

10 . To see the contents of a docker image use the below command 


11. We can login to the container image using the below command 


12. stop the container


13 Start the container 


14 . To map the ports inside the docker use below commands


15. Inspecting  a docker container using docker inspect <docker id>


16 Docker let's you to store data such as configuration settings encryption keys and external resource address in environment variables . At run time environment variables are exposed to the application inside the container. We can set the environment variables inside a services containers with environment key .
           Below are the example of setting below parameters inside a maradb image 


  • First pull the image of mariadb 


  • We can check the status of the image using below command 


  • No let's run the command to start the database container by passing required variables mentioned above 


  • The container was created successfully and we need to verify whether example_user has the access to example database 


Thank you for reading and stay tuned for more topics 


Thursday, August 9, 2018

Docker installation and configuration

Here i am giving the example for docker installation and configuration in a Centos -7 system


Docker have 2 editions community edition and enterprise edition and docker CE has two update channels stable,edge


  • stable will give you updates on every quarter   
  • edge will give you updates on every month 

below are the details of the different server,cloud versions which supports CE and EE


1. First login to the server Centos-7 and run "yum-check-update" command


2. There is one installation script is available in the web called https://get.docker.com
we are installing the docker using that script


3. Once the docker is installed we need to make it start and enable the service 


4. Now we need to give the permission to the local user (here unixchips) to run docker commands 


5. Once you given the permission we can able to run the command without any sudo permission 


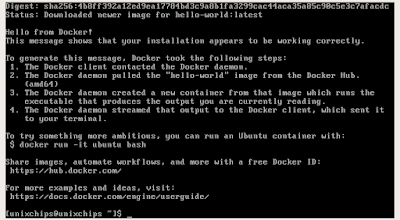
6. The best way to check the status of the docker installation is to run the below command 

"docker run hello-world" and the expected out is given below 


7. Let's search the httpd image through the docker 


Also if we need to check the image details we will get it from "https://hub.docker.com"


8. Now we can pull the httpd image to the docker

If we click on the httpd official project we can see the latest one is apache 2.4.29


let's pull the image through docker command


9. Now if we check the docker mages we can see the downloaded http image


10 .If we need to remove one image we have to use the below command


More docker management commands will be explained in next post

Thanks for reading 

Tuesday, August 7, 2018

Docker concepts

What is a container

Traditionally software applications are deployed following a monolithic architecture approach  where each components are dependent or locked each other. The major drawback of  this approach is lack of reliability , scailability and high availability. Also traditional software deployment will be in the life cycle of test,dev,production environment which is a time consuming task.

     Containers are a new generation of virtual machines. That brings software development to a new level . Containers are an isolated set of different rules and resources inside a single operating system. This means containers can provide benefits as virtual machines but use less CPU,memory and storage.  There are several popular containers like LXC,Rocket,Docker.

 Container features and advantages 

Some of the major advantages of containers are as follows:
  • Efficient hardware resource consumption - if we are using normal virtualisation method to host our applications in a VM environment we may need OS to be installed in each VM to host different applications and sometime we can observed that major part of system resources are utilised by OS where the applications used to face lac of CPU and memory which will impact the performance. But in container technology we have OS installed in only in one system and different containers are installed on top of that . 

  • Application and service isolation - imagine if we have 10 applications hosted in a single server ,each applications has number of dependencies (like packages,libraries etc). If we need to update the packages we need to update all of it's dependencies which may impact another applications also. In container technology each application is isolated to each other and application update is an easy process.

  • Faster deployment - Using container images we can speed up the deployment . To restart applications in containers will take only some seconds where restarting the VM's will take minutes.The main reason is container does not need to restart an OS while restarting containers. 

  • Micro services architecture - Containers bring the application deployment to a new level called micro services architecture where our applications are parted to different  pieces and installing n different containers. For example if our application contains a webserver and a database server, usually in traditional level we will install it in different VM's . But in container we will install it in different containers on top of a single OS and allows them to communicate each other.

  • The stateless nature of containers - Containers are stainless which means you can create destroy bring up and down the containers at any time and it will not affect the application performance. This is one of the greatest features of the container.

 Difference between containers and VM's

                                       VM'S                                           Containers 


Each virtualized application includes not only the application binaries, but the OS also which may consume GB of space and memory

Where the container only contains application binaries and libraries which consumes MB of spaces and very less memory.

To create a VM it might take minutes where the container creation takes only seconds

The Average booting time of a VM is 600 seconds (depends up on the OS) where the container will be up with in seconds 

A VM snapshot might take minutes where the container snapshot will take only seconds

Docker container architecture 


Docker s one of the most popular application container technology now a days. This is an opensource technology and docker made partnership with industry reputed companies like Redhat,google. It allows creating sharing and running applications inside docker containers in an efficient manner 

 Docker uses client server type architecture 

Docker server: - This is a service running in an operating system. This service is responsible for downloading,building and running containers 

Docker Client: - This is a CLI tool which is responsible for communicating with docker server using REST API 

Docker main components 

Docker containers : - Isolated user space environments running the same or different applications and sharing the same host OS. Containers are created from docker mages 

Docker Images:- Docker templates or docker images are the bundle of application libraries and respective applications. These mages used to create containers and we can bring up the containers immediately .

Docker registries :- This is an image store and these registries can be public or private which means we can download the images from internet or we can create our own store.

Linux Containers

Below are the main features of the Linux kernel which is used to help docker functioning as a container 

Linux name spaces : - This is a feature of the linux kernel to isolate applications each other.This allows one set of linux processes to see one group of resources while allowing another set of processes. Examples of linux name spaces are Mount (mnt), Process ID (PID), Network, User ID, Inter Process Communication (IPC). One of the best example of name spaces is two processes in two different mounted namespaces may have different views of what the mounted root file system is. Each container has specific name spaces and same will be used inside respective containers only.

 Control groups ( C-Groups) : - This feature can be use to control the system resources effectively .
C-groups allows containers to control resource utilisation on container wise.

SE-Linux : - Security Enhanced linux is a mandatory access control used for isolated system access. Docker is using the SE-Linux to protect the hosts and isolate the containers each other.

Docker Image file systems 

Docker image s a read-only template to build containers. An image consist of number of layers which can be accessed as a single virtual file  system by the docker. Simply saying docker images are read only but we can add extra layers and create new images .


The container filesystem, used for every Docker image, is represented as a list of read-only
layers stacked on top of each other. These layers eventually form a base root filesystem for a
container. In order to make it happen, different storage drivers are being used. All the
changes to the filesystem of a running container are done to the top level image layer of a
container. This layer is called a Container layer. What it basically means is that several
containers may share access to the same underlying level of a Docker image, but write the
changes locally and uniquely to each other

Container Image layers 

Docker image contains number of layers that are combined to a single file system using storage driver.The layers (images) are created when commands are executed during image build process. Each layer except the last one is read only so what ever the changes are doing in the images will get reflected to the top layer only.


Docker Registries  

Docker registries are the method to share the image public or private mode which is also called docker store. This is highly scalable server side applications which you  can use to store download docker images. As it is open source project users can download the images and create new docer mages with necessary changes . Docker registries are 2 type 

Public registry 

You can start a container from an image stored in a public registry. By default, the Docker
daemon looks for and downloads Docker images from Docker Hub, which is a public
registry provided by Docker. However, many vendors add their own public registries to
the Docker configuration at installation time 

Private Registry 

Organisations which do not want some specific images which they don't want to share public will create their own registries called private registry . So it have access only from with in your internal  network.

You can easily install a private Docker registry by running a Docker container from a public
registry image. The private Docker registry installation process is no different from running
a regular Docker container with additional options.

Docker registries can be accessed from docker client through http method using REST API.

Installation and configuration of the docker will be explained in another post

Thanks for reading .....


Friday, August 3, 2018

Python OS functions explained


The OS module in python is very useful for testing the functionality of underlying operating system like linux,Mac,windows etc

before applying these modules we need to import the os module using the command  import os

The main os functions are given below

os.system ()- this is for executing shell command 


ex: os.system ("rpm --ivh aide*")  - this will install the aide rpm in the system 


os.stat () - This command will give the status of a file 


ex: print "getting the status of: ", os.stat('/usr/bin/python')

getting the status of:  posix.stat_result(st_mode=33261, st_ino=1051053, st_dev=2054, st_nlink=1, st_uid=0, st_gid=0, st_size=3542008, st_atime=1532933669, st_mtime=1511456897, st_ctime=1519176316)


os.environ() - Get the users environment


ex: 

import os

ux = os.environ['HOME']
print ux

out:/home/unixchips


os.chdir() # Move focus to a different directory

ex:

import os

print os.chdir('/home/unixchips/Desktop')

print (os.getcwd())

output: /home/unixchips/Desktop

os.getgid() # Return the real group id of the current process

ex:

import os

print os.getgid()

output:1000

os.getuid() # Return the current process’s user id

ex:

import os

print os.getuid()

output: 1000

os.getpid() # Returns the real process ID of the current process

ex:

import os

print os.getpid()

output:18616

getpass.getuser()# Return the name of the user logged

ex:

import getpass

print (getpass.getuser())

output:unixchips


os.access() # Check file status 

ex:

import os
path = '/tmp/test.txt'
print os.access(path, os.R_OK)

output:True

os.chmod() # Change the mode of path to the numeric mode

in this case you need to import a module called stat along with OS which will act a parameter , below are the parameter's used to change the ownership of a file 


stat.S_ISUID − Set user ID on execution.


stat.S_ISGID − Set group ID on execution.


stat.S_ENFMT − Record locking enforced.


stat.S_ISVTX − Save text image after execution.


stat.S_IREAD − Read by owner.


stat.S_IWRITE − Write by owner.


stat.S_IEXEC − Execute by owner.


stat.S_IRWXU − Read, write, and execute by owner.


stat.S_IRUSR − Read by owner.


stat.S_IWUSR − Write by owner.


stat.S_IXUSR − Execute by owner.


stat.S_IRWXG − Read, write, and execute by group.


stat.S_IRGRP − Read by group.


stat.S_IWGRP − Write by group.


stat.S_IXGRP − Execute by group.


stat.S_IRWXO − Read, write, and execute by others.


stat.S_IROTH − Read by others.


stat.S_IWOTH − Write by others.


stat.S_IXOTH − Execute by others.


ex:

import os, stat

os.chmod('/tmp/test.txt',stat.S_IRWXU)

(this will provide executable permission to the /tmp/test.txt by the owner )
output: -rwx------ 1 unixchips unixchips    0 Jul 31 23:39 test.txt


os.chown() # Change the owner and group id

(you need to perform this as a root user only)

ex:

import os, sys

os.chown("/tmp/test.txt", 1001, 1001)

output: -rwx------ 1 ratheesh  ratheesh     0 Jul 31 23:39 test.txt


os.umask(mask) # Set the current numeric umask


import os


os.umask(0777)
open("/tmp/sample.txt", "w").close()

output:                ---------- 1 root      root         0 Aug  1 21:04 sample.txt


os.getsize() # Get the size of a file


import os


print os.path.getsize("/tmp/test.txt")

output: 20 (as it is a 20B file)


os.environ() # Get the users environment

suppose if we want to get the home directory of current user root below program can be used 

ex:


import os

print os.environ.get('HOME')

output:root

to get all the environment variables of a user below program 


import os

for param in os.environ.keys():

    print "%20s %s" % (param,os.environ[param])

output
*******************************************************************************
/root
root@unixchips:~# nano env.py
root@unixchips:~# nano env1.py
root@unixchips:~# python env1.py 
                LANG en_IN
                TERM xterm-256color
               SHELL /bin/bash
           LESSCLOSE /usr/bin/lesspipe %s %s
          XAUTHORITY /home/unixchips/.Xauthority
            LANGUAGE en_IN:en
               SHLVL 1
QT_QPA_PLATFORMTHEME appmenu-qt5
            LESSOPEN | /usr/bin/lesspipe %s
                 PWD /root
             LOGNAME root
                USER root
                PATH /usr/local/sbin:/usr/local/bin:/usr/sbin:/usr/bin:/sbin:/bin:/snap/bin
                MAIL /var/mail/root
           LS_COLORS rs=0:di=01;34:ln=01;36:mh=00:pi=40;33:so=01;35:do=01;35:bd=40;33;01:cd=40;33;01:or=40;31;01:mi=00:su=37;41:sg=30;43:ca=30;41:tw=30;42:ow=34;42:st=37;44:ex=01;32:*.tar=01;31:*.tgz=01;31:*.arc=01;31:*.arj=01;31:*.taz=01;31:*.lha=01;31:*.lz4=01;31:*.lzh=01;31:*.lzma=01;31:*.tlz=01;31:*.txz=01;31:*.tzo=01;31:*.t7z=01;31:*.zip=01;31:*.z=01;31:*.Z=01;31:*.dz=01;31:*.gz=01;31:*.lrz=01;31:*.lz=01;31:*.lzo=01;31:*.xz=01;31:*.bz2=01;31:*.bz=01;31:*.tbz=01;31:*.tbz2=01;31:*.tz=01;31:*.deb=01;31:*.rpm=01;31:*.jar=01;31:*.war=01;31:*.ear=01;31:*.sar=01;31:*.rar=01;31:*.alz=01;31:*.ace=01;31:*.zoo=01;31:*.cpio=01;31:*.7z=01;31:*.rz=01;31:*.cab=01;31:*.jpg=01;35:*.jpeg=01;35:*.gif=01;35:*.bmp=01;35:*.pbm=01;35:*.pgm=01;35:*.ppm=01;35:*.tga=01;35:*.xbm=01;35:*.xpm=01;35:*.tif=01;35:*.tiff=01;35:*.png=01;35:*.svg=01;35:*.svgz=01;35:*.mng=01;35:*.pcx=01;35:*.mov=01;35:*.mpg=01;35:*.mpeg=01;35:*.m2v=01;35:*.mkv=01;35:*.webm=01;35:*.ogm=01;35:*.mp4=01;35:*.m4v=01;35:*.mp4v=01;35:*.vob=01;35:*.qt=01;35:*.nuv=01;35:*.wmv=01;35:*.asf=01;35:*.rm=01;35:*.rmvb=01;35:*.flc=01;35:*.avi=01;35:*.fli=01;35:*.flv=01;35:*.gl=01;35:*.dl=01;35:*.xcf=01;35:*.xwd=01;35:*.yuv=01;35:*.cgm=01;35:*.emf=01;35:*.ogv=01;35:*.ogx=01;35:*.aac=00;36:*.au=00;36:*.flac=00;36:*.m4a=00;36:*.mid=00;36:*.midi=00;36:*.mka=00;36:*.mp3=00;36:*.mpc=00;36:*.ogg=00;36:*.ra=00;36:*.wav=00;36:*.oga=00;36:*.opus=00;36:*.spx=00;36:*.xspf=00;36:
                HOME /root
             DISPLAY :0
                   _ /usr/bin/python
********************************************************************************


os.uname() # Return information about the current operating system

ex:
import os

print os.uname()

output:   ('Linux', 'unixchips', '4.15.0-24-generic', '#26~16.04.1-Ubuntu SMP Fri Jun 15 14:35:08 UTC 2018', 'x86_64')


os.chroot(path) # Change the root directory of the current process to path & os.getcwd

ex:
import os, sys

os.chdir("/tmp")
print os.getcwd()

output: /tmp

os.chroot(path) # Change the root directory of the current process to path

ex:

import os

print os.listdir('/tmp')

output: (will display the contents of the /tmp directory)

['.XIM-unix', 'systemd-private-5ccc0291bc60473d8d8fc248cff92fd3-systemd-timesyncd.service-OnYY3G', 'gnome-software-D9QEMZ', 'gnome-software-E1KUMZ', 'Temp-8984a84e-9508-434e-8180-a9cfbaa969c8', '.font-unix', 'gnome-software-VTVXMZ', 'gnome-software-N6ZDMZ', 'sample.txt', 'test.txt', '.wine-1000', '.Test-unix', 'gnome-software-3RD9MZ', '.org.chromium.Chromium.KfRkcm', 'systemd-private-5ccc0291bc60473d8d8fc248cff92fd3-rtkit-daemon.service-wVPLTC', 'unity_support_test.0', '.X0-lock', 'gnome-software-UMBENZ', 'gnome-software-IY0GNZ', 'gnome-software-4GZUMZ', '.ICE-unix', 'systemd-private-5ccc0291bc60473d8d8fc248cff92fd3-colord.service-BSHI7z', '.X11-unix', 'config-err-SiAh3i', 'gnome-software-3657MZ', '.org.chromium.Chromium.dI8BqE', 'gnome-software-SSMSMZ', 'gnome-software-XX9GMZ']


os.getloadavg() # Show queue averaged over the last 1, 5, and 15 minutes

ex:
import os

print os.getloadavg()

output: (which will display load average of  1,5,15 minutes)
(0.75, 0.69, 0.59) 


os.path.exists()# Check if a path exists

ex:

import os

print os.path.exists('/tmp/test.txt')

output: true


os.walk() # Print out all directories, sub-directories and files

The syntax of the os.walk will be 

os.walk(top[, topdown=True[, onerror=None[, followlinks=False]]])

  • top − Each directory rooted at directory, yields 3-tuples, i.e., (dirpath, dirnames, filenames)
  • topdown − If optional argument topdown is True or not specified, directories are scanned from top-down. If topdown is set to False, directories are scanned from bottom-up.
  • onerror − This can show error to continue with the walk, or raise the exception to abort the walk.
  • followlinks − This visits directories pointed to by symlinks, if set to true.

ex:


import os
for root, dirs, files in os.walk("/tmp", topdown=False):
   for name in files:
      print(os.path.join(root, name))
   for name in dirs:
      print(os.path.join(root, name))


output: ( List all directories /subdrectories  and files 


/tmp/systemd-private-5ccc0291bc60473d8d8fc248cff92fd3-systemd-timesyncd.service-OnYY3G/tmp
/tmp/gnome-software-D9QEMZ/debconf.socket
/tmp/gnome-software-E1KUMZ/debconf.socket
/tmp/gnome-software-VTVXMZ/debconf.socket
/tmp/gnome-software-N6ZDMZ/debconf.socket
/tmp/.wine-1000/server-806-3e0902/lock
/tmp/.wine-1000/server-806-3e0902
/tmp/gnome-software-3RD9MZ/debconf.socket
/tmp/.org.chromium.Chromium.KfRkcm/SingletonCookie
/tmp/.org.chromium.Chromium.KfRkcm/SingletonSocket
/tmp/systemd-private-5ccc0291bc60473d8d8fc248cff92fd3-rtkit-daemon.service-wVPLTC/tmp
/tmp/gnome-software-UMBENZ/debconf.socket
/tmp/gnome-software-IY0GNZ/debconf.socket
/tmp/gnome-software-4GZUMZ/debconf.socket
/tmp/.ICE-unix/2087
/tmp/systemd-private-5ccc0291bc60473d8d8fc248cff92fd3-colord.service-BSHI7z/tmp
/tmp/.X11-unix/X0
/tmp/gnome-software-3657MZ/debconf.socket
................................................

os.mkdir(path) # Create a directory named path with numeric mode mode

ex: 
import os 

os.mkdir('/tmp/ratheesh')

output: 
drwxr-xr-x 2 root root 4096 Aug  3 14:09 /tmp/ratheesh/


os.rmdir(path) # Remove (delete) the directory path


ex:
import os

os.rmdir('/tmp/ratheesh')

output:
root@unixchips:~# ls ld /tmp/ratheesh
ls: cannot access 'ld': No such file or directory
ls: cannot access '/tmp/ratheesh': No such file or directory


os.rename(src, dst) # Rename the file or directory src to dst

ex:
import os

os.rename('/tmp/test.txt', '/tmp/test1.txt')

output:
-rwx------ 1 ratheesh ratheesh 20 Aug  1 21:11 /tmp/test1.txt