Monday, October 21, 2013

Changing the HDD in netapp and assign the same as spare


Some times we used to face HDD failure in netapp and the role of the failed HDD will be taken care by the spare HDD(Raid 4 setup). So the system will throw the error as "Not enough spare disk" So in this case we have to change the failed HDD with a new one ( should be same size and make with the parent one).


If we check the ONTAP gui the failed HDD will show as broken state (0c.00.6)


So first we need to remove the faulty HDD using below mentioned command


#Remove –w 0c.00.06


Then identify the physical disk in the netapp mounted rack which have lights off and remove the HDD physically from the controller .


Insert the new HDD in the same location and wait till the light become green.


Then run the below commands through console ( ssh or telnet)


#priv set advanced


# disk assign 0c.00.06 -s unowned -f


So disk will become orphan state , and next we have to assign the same as spare


#disk unfail -s 0c.00.06


So once we check in GUI we can see that the disk which was in orphan state was assigned as spare to the same controller .


(below case it was 0c.00.2)


Tuesday, April 9, 2013

                         MySQL hardening script 


The MySQL database has become the world's most popular open source database because of its
consistent fast performance, high reliability and ease of use.This script gives some of the
best pracise steps to secure your database from attacks and vulnurabilities for improved
performance .
******************************************************************************
#!/bin/bash

#########################Mysqlhardeningscript################################################################Author:ratheeshvasudevan########################################
read -p "Enter mysql root password" mysqlpass

# Setting password for users 
a=`mysql -uroot -p$mysqlpass -Dmysql --execute "select User from mysql.user where length(password) = 0
or password is null;"`

if [ -z "$a" ]; then

echo "Already password is configured for all users" >> /tmp/mysqlhardening.txt

else

for i in $a

do

`mysql -uroot -p$mysqlpass -Dmysql --execute "UPDATE mysql.user SET password=PASSWORD('onmobile')  WHERE user='${i}'and length(password) = 0;"`

`mysql -uroot -p$mysqlpass -Dmysql --execute "flush privileges;"`

echo "password is set to 'onmobile'" >> /tmp/mysqlhardening.txt

done

fi
#Remove Anonymous account

`mysql -uroot -p$mysqlpass -Dmysql --execute "delete from mysql.user where user = '';"`

if [ $? -eq 0 ]; then

echo "Anonymous account is removed" >> /tmp/mysqlhardening.txt

fi
#Remove shutdown privilege for non root users 

b=`mysql -uroot -p$mysqlpass -Dmysql --execute "select user from mysql.user where Shutdown_priv = 'Y';" |grep -v "user" |grep -v "host" |grep -v "root"`

if [ -z "$b" ]; then

echo "No non admin users with shutdown privileges" >> /tmp/mysqlhardening.txt

else

for i in $b

do

mysql -uroot -p$mysqlpass -Dmysql --execute "update mysql.user set Shutdown_priv = 'N' where user='${i}';"

done

echo "removed the shutdown privileges for non admin users" >> /tmp/mysqlhardening.txt

fi

#Remove Create user privilege for non root users

c=`mysql -uroot -p$mysqlpass -Dmysql --execute "select user from mysql.user where Create_user_priv= 'Y';" |grep -v "user" |grep -v "host" |grep -v "root"`

if [ -z "$c" ]; then

echo "No non admin users with create user privileges" >> /tmp/mysqlhardening.txt

else

for i in $c

do

mysql -uroot -p$mysqlpass -Dmysql --execute "update mysql.user set Create_user_priv='N' where user='${i}';"

done
echo "Removed create user priv for non admin users" >> /tmp/mysqlhardening.txt

fi

#Remove Reload privilege for non admin users

d=`mysql -uroot -p$mysqlpass -Dmysql --execute "select user from mysql.user where Reload_priv = 'Y';" |grep -v "user" |grep -v "root"`

if [ -z "$d" ]; then

echo "No non admin users with reload privileges" >> /tmp/mysqlhardening.txt

else

for i in $d

do

mysql -uroot -p$mysqlpass -Dmysql --execute "update mysql.user set Reload_priv='N' where user='${i}';"

done

echo "Removed Reload privileges for non admin users" >> /tmp/mysqlhardening.txt

fi

#Remove GRANT Privileges for non admin users

e=`mysql -uroot -p$mysqlpass -Dmysql --execute "select user from mysql.user where Grant_priv = 'Y';" |grep -v "user" |grep -v "root"`

if [ -z "$e" ]; then

echo "No non admin users with GRANT privileges" >> /tmp/mysqlhardening.txt

else 

for i in $e

do

mysql -uroot -p$mysqlpass -Dmysql --execute "update mysql.user set Grant_priv = 'N' where user='${i}';"

done

echo "Removed non admin users with GRANT privileges" >> /tmp/mysqlhardening.txt

fi

#Old password hashing

f=`mysql -uroot -p$mysqlpass -Dmysql --execute "show variables like 'old_passwords';" |grep -v "Variable_name" |grep -v "Value" |awk -F " " '{print $2}'`

if [ `echo "$f" |grep -c "OFF"` -eq 1 ]; then

echo "Old password hashing is disabled already" >> /tmp/mysqlhardening.txt

else

mysql -uroot -p$mysqlpass -Dmysql --execute "set old_passwords = 'OFF';"

echo "old_password is set to OFF" >> /tmp/mysqlhardening.txt

fi

#Remove show database privilege for all non admin users 

g=`mysql -uroot -p$mysqlpass -Dmysql --execute "select user from mysql.user where Show_db_priv='Y';" |grep -v "user" |grep -v "root"`

if [ -z "$g" ]; then

echo "No non admin users with Show_db_priv" >> /tmp/mysqlhardening.txt

else

for i in $g 

do

mysql -uroot -p$mysqlpass -Dmysql --execute "update mysql.user set Show_db_priv='N' where user='${i}';"

done

fi

#Adding Secure auth in myql config

h=`mysql -uroot -p$mysqlpass -Dmysql --execute "show variables like 'secure_auth';" | grep -v "Variable_name" |grep -v "Value" |awk -F " " '{print $2}'`

if [ `echo "$h" |grep -c "OFF"` -eq 1 ]; then

sed -i "/^\[mysqld\]/ a\\secure_auth" /etc/my.cnf

else

echo "secure_auth is already configured in this DB" >> /tmp/mysqlhardening.txt
fi

#Removing grant tables option in mysql config 

j=`mysql -uroot -p$mysqlpass -Dmysql --execute "show variables like 'skip_grant_tables'" |grep -v "Variable_name" |grep "Value" |awk -F " " '{print $2}'`

if [ `echo "$j" |grep -c "OFF"` -eq 1 ]; then

echo "Grant tables option is already disabled in this DB" >> /tmp/mysqlhardening.txt

elif [ `echo "$j" |grep -c "ON"` -eq 1 ]; then

sed -i 's/skip_grant_tables/#skip_grant_tables/g' /etc/my.cnf

else

echo "Grant tables option is not avilable in this DB" >> /tmp/mysqlhardening.txt

fi

#Removing skip merge option from mysql

k=`mysql -uroot -p$mysqlpass -Dmysql --execute "show variables like 'have_merge_engine'" |grep -v "Variable_name" |grep "Value" |awk -F " " '{print $2}'`

if [ `echo "$k" |grep -c "DISABLED"` -eq 1 ]; then

echo "merge option is already disabled in this DB" >> /tmp/mysqlhardening.txt

elif [ `echo "$k" |grep -c "ENABLED"` -eq 1 ]; then

sed -i 's/skip_merge/#skip_merge/g' /etc/my.cnf

else

echo "merge option is not avilable in this DB" >> /tmp/mysqlhardening.txt

fi

#Removing client password from mysql config

r=`cat /etc/my.cnf |grep -A 4 "\[client\]"|grep "#password"`

cl_en=1


if [ `echo "$r" |grep -c "#password"` -eq 1 ]; then

echo "Client password is not enabled in this DB" >> /tmp/mysqlhardening.txt

else

sed -i 's/password/#password/' /etc/my.cnf

fi


#Disable interactive login

l=`cat /etc/passwd |grep mysql | awk -F ":" '{print $7}'`

if [ `echo "$l" |grep -c "/bin/bash"` -eq 1 ]; then 

usermod -s /sbin/nologin mysql

echo "interactive login is disabled for mysql user" >> /tmp/mysqlhardening.txt

else

echo "interactive login is already disabled" >> /tmp/mysqlhardening.txt

fi

#Check file system permissions 

m=`mysql -uroot -p$mysqlpass -Dmysql --execute "show variables like 'datadir';" |grep -v "variable_name" |grep -v "Value" |awk -F " " '{print $2}'`

n=`stat --format '%a' $m`

if [ `echo "$n" |grep -c "755"` -eq 1 ]; then 

echo "permission is already set for datadir" >> /tmp/mysqlhardening.txt

else 

chmod 755 $m

echo "permission is reseted for datadir" >> /tmp/mysqlhardening.txt

fi

#Configuration file permission 

o=`stat --format '%a' /etc/my.cnf`

if [ `echo "$o" |grep -c "644"` -eq 1 ]; then

echo "configuration file permission is already set for this DB" >> /tmp/mysqlhardening.txt

else

chmod 644 /etc/my.cnf

echo "Configuration file permisison is set to 644" >> /tmp/mysqlhardening.txt

fi
#Removing test database
p=`mysql -uroot -p$mysqlpass --execute "show databases;" |grep "test"`

if [ -z "$p" ]; then

echo "test database is not available in this DB" >> /tmp/mysqlhardening.txt

else

mysql -uroot -p$mysqlpass --execute "drop database test;"

echo "test database is succesfully removed" >> /tmp/mysqlhardening.txt

fi

echo "Hardening of MysqlDB is completed for this server. Please check /tmp/mysqlhardening.txt for details"


Thursday, January 17, 2013

                               Oracle Start up script 


Usually oracle database can be started or stopped by  logging in to the DB as sysdba and applying "startup" and "shutdown immediate" commands. Here i am providing you a script to configure the same in /etc/init.d/ and we can start, stop and check the status of the oracle with PID details .

Sample script 
*********************************************************************************
#!/bin/bash
# chkconfig: 35 95 1
# description: init script to start/stop oracle database 10g, TNS listener
#
#
# match these values to your environment:
export ORACLE_BASE=/oracle
export ORACLE_HOME=/oracle/product/11.2.0/dbhome_1
export OH=$ORACLE_HOME
export JAVA_HOME=$OH/jdk
export PATH=$OH/bin:$JAVA_HOME/bin:$PATH
export LD_LIBRARY_PATH=$ORACLE_HOME/lib:$LD_LIBRARY_PATH
export ORACLE_SID=MBDB
export ORACLE_USER=oracle
# see how we are called:
case $1 in
    start)
    echo "Starting Oracle database ..."
    su - "$ORACLE_USER" <<EOO
    lsnrctl start
    sqlplus /nolog <<EOS
    connect / as sysdba
    startup
EOS
    emctl start dbconsole
EOO
    ;;
        
   stop)
    echo "Stopping Oracle database ..."
    su - "$ORACLE_USER" <<EOO
    emctl stop dbconsole
    sqlplus /nolog <<EOS 
    connect / as sysdba
    shutdown immediate
EOS 
    lsnrctl stop
EOO
;;


    restart){
 $0 stop
 $0 start
}
    ;;

   status)
  a=`ps -ef |grep oracle |grep LISTENER |awk -F " " '{print $2}'|head -1`
  if [ "$a" > 0 ];then
  echo "Oracle is working fine with pid $a"
  else
  echo "Oracle is not working"
  fi
   ;;

    *)
    echo "Usage: $0 {start|stop|restart|status}"
    ;;
esac
*********************************************************************************

Startup output 


stop output


status 


This script will be useful while configuring oracle in HA ( High Availability ) setups 

Sunday, December 23, 2012

                                  Linux Booting Procedure 


Here I am giving you a detailed view about linux booting procedure. As we know linux booting involves multiple steps and stages . Here it the brief  diagram for better understanding. 


As per the diagram i will explain each and every process as detail.

1. The initial process is called POST ( Power On Self Test) where the bios will start addressing from a particular location (0xFFFF0). The function of the bios in this stage is to perform hardware check and device initialization . Basically BIOS contain two processes one is for POST and other one will initialize the necessary hardware. To boot the operating system BIOS will search the bootable device where the preference  is defined in the CMOS chip of the system. Bootable devices may be a partition of harddisk, CD-ROM, USB flash drive, a network device etc.

2. Commonly linux is booting from HDD, where the Master Boot Record (MBR) contains the primary boot loader. MBR is the 512 byte size where the first 446 byte contains the boot loader (executable code and error text) , 64 byte contains the partition table details of 4 partitions and next 2 byte is the magic number (0xAA55). The magic number serves as a validation code for MBR. The primary function of the primary boot loader is to identify the secondary boot loader (in stage 2) by looking in the  MBR . It will check the active partition and remaining partitions also will be validated by cross checking with MBR and add the details to RAM for execution.

3. The second boot loader is called as kernel loader and the task of this stage is to load the linux kernel with RAM disk. The boot loader for this stage is called as GRUB ( previously LILO also available). GRUB stands for Grant Unified Boot loader and the major difference between GRUB and LILO is GRUB can recognize the file systems. GRUB can load the linux kernel from ext2 or ext3 file systems and this will be accomplished by making the normal 2 stage boot process in to 3 stage boot process.  Stage 1 (MBR) will load the stage 1.g boot loader which will understand the file system where the linux kernel belongs. For example reiserfs_stage1_5 (for loading Reiser journeling file systems) and e2fs_stage1_5 ( for loading ext2 and ext3 file systems) . In stage 2 GRUB will list the avilable kernel modules and as per the default configuration mentioned in /etc/grub.conf (soft links to /boot/grub/grub.conf) it will load the kernel image and default initrd image to the memory .

                                                                                                          GRUB boot loader


                                                           /etc/grub.conf (/boot/grub/grub.conf)


1. default=0
As default first kernel entry will be get loaded in the system and if you have multiple kernel entries you have to change the default value according to that.
2.timeout=5
While system will boot it will wait 5mins for user selecting the kernel
3.SplashImage
It will load the image while you booting the OS. The default location of the image is mentioned in the line. ( you can change the back ground image to your own by following method
#convert image.png -resize 640x480 -colors 14 splash.xpm
#gzip splash.xpm)
4.hiddenmenu
This will hide the boot menu as default and you can see the boot menu once you press e in grub. ( if  you want to see the boot menu as default you can comment this option)
5.title
This will set the title for kernel lebel as "CentOS (2.6.18-128.el5)
6.root (hd0,0)
This indicates hard drive and partition details
7.kernel
This settings will load the kernel image and mount the root file system in /dev/VolGroup00/LogVol00 and kernel will execute /sbin/init with a process id of 1
8.initrd
Initrd has executable driver modules and it will load the RAM disk.

Kernel 


Kernel is the executable program with compressed stage ( size of 512 KB approximately ) . Kernel will be loaded in RAM disk for execution purpose . This execution will happen trough 3 stages.

a. Assembly routine - Initial stage system will invoke ./arch/i386/boot/head.s and function of this stage is to check basic hardware setup for kernel and it will invoke startup_32 function.

b.Startup_32 - This function will be called from ./arch/i386/boot/compressed/head.c and this function will set up basic environment (stack etc) for kernel booting.

c. decompress_kernel- This function will decompress the kernel and load to the memory and same will be loaded from ./arch/i386/boot/compressed/misc.c

Along with these three functions one more startup_32 function also will be called and this function will do the memory allocation by initializing page tables and enabling memory paging. Once the initrd function is enabled it will act as a RAM disk and allows the kernel to mount the /root file system temporarily also this will allows to detect the file real file systems and network to mount the original file systems for booting process.

Init process 

After the kernel boots init process (/sbin/init)will be started according to the configuration in /etc/inittab

Sample inittab file 


Also you can see this script will call the system initialization script called /etc/rc.d/rc.sysinit which have following functions 

  • run /sbin/initlog - To log the init process 
  • run devfs to manage and run devices 
  • run network scripts /etc/sysconfig/network
  • start graphical boot if configured (RHGB)
  • start console terminals,load keymap,systemfonts - /sbin/mingetty & /sbin/setsysfont
  • mount /proc for starting device controllers 
  • unmount initrd which was mounted in /root for inital booting procedure 
  • mount the /root as RW mode
  • Direct the kernel to load kernel parameters and modules - sysctl,depmod,modprobe
  • set up the clock - /etc/sysconfig/clock
  • perform disk operations as per /sbin/fsck configuration 
  • check mount quatos in non root file systems - fsck,mount,quotacheck,quotaon
  • initialize logical volume - vgscan,/etc/lvmtab
  • activate syslog , write to log files - dmesg 
  • configure sound - sndconfig
  • activate PAM module 
  • activate swapping - swapon 
system will boot as per the run level mentioned in the /etc/initab :initdefault 

Login Process 

The first process which includes in login process in /sbin/mingetty as per the configuration mentioned in  /etc/inittab file (1:2345:respawn:/sbin/mingetty tty1).These lines cause init to spawn mingetty process on run level 2 to 5 . To do this it will use the fork function to make a copy of itself and use the exec function to run the mingetty program .  Once the mingetty is loaded it will execute the login prompt and waits till user enter the user name.If the user enter the user name it will prompt the password and password will be cross checked along with /etc/passwd entry . If the credentials are correct respective shell is logged for the user as per the configuration in /etc/passwd .

I am mentioning the files which involve in login process and its respective roles 

/etc/nologin- This file prevents from user's who are not root from login to the system
/etc/usertty - User to impose special access restriction to user's
/etc/securetty- controls the terminals that the root user can login
.hushlogin - When this file exists in the user home directory , it will prevents the user to check the mail, view the last login and motd message.
/var/log/lastlog- contains the information about the last login details of the user.
/etcpasswd - contains the information about the user UID, password in encripted format and its respective shell details.


Tuesday, December 18, 2012

OSPF - A detailed review and configuration

          OSPF ( Open Shortest Path First) - A detailed review and configuration .


Open Shortest Path First is a routing protocol which is using in bigger networks (mainly ISP's & Telecom networks) in now a days . It is based on link state advertisements and currently OSPF V2 is running which is developed in 1991 as per RFC 1247. The major advantages of OSPF are
1. Classless protocol
2.Supports VLSM (Variable Length Subnet Mask)
3.Using Multicast address to advertise link updates (224.0.0.4 - SPF routers & 224.0.0.5-DR routers )
4. Supports Plain text and MD5 authentication Mechanism
5. Works as per Dijkstra algorithm.

OSPF packet details 

OSPF is using different types of packets for its communication, and the details are mentioned below 

OSPF Packet types
Type Description Functionality
1 Hello To discover neighbors and selects DR&BDR* routers to exchange capabilitis
2 Database Description To elect master/slave for router database exchange process to exchange the LSA headres
3 Link-State-Request To request specefic LSA (Link State Advertisements )
4 Link-State-Update To send entire to the neighbor who requested the particular LSA through the LSR packet
5 Link-State-Acknowledge To acknowledge and recept LSU packet
(* DR- Designated Router is the router an OSPF area where all other router's will send their Link State Advertisements.
BDR- Backup Designated Router - This will take the responsibility of the DR if the DR is failed in an area)

Sample OSPF Packet 

OSPF – Packet details
32 bit
version type packet length
router ID
area ID
        checksum                                    |                                        Autype
Authentication
Authentication


A sample OSPF packet is 32 bit length and its details are given below

Version - This mainly indicates what version of the OSPF is running. Currently OSPF V2 is running.

Type- Indicates the OSPF packet type ( details are given above)

Packet Length- Total length of the OSPF packet

Router ID- This indicates ip address of the router . For cisco router highest ip address will take as the router ID. If loop back ip is configured highest loop back will take as router ID

Area ID- This filed checks the area of the packet belongs to. This is a 4 byte number and both routers should have same area ID to form neighbor relation ship.

Check Sum - This part will check the status of the entire OSPF packet.

Autype- Autype filed will check the respective authentication type configured for OSPF.
different Autypes are
1. 0 indicates no authentication
2. 1 indicates plain text authentication
3. 2 indicates MD5 authentication

Authentication - Indicates the authentication key for plain text authentication type.

Sample OSPF configuration


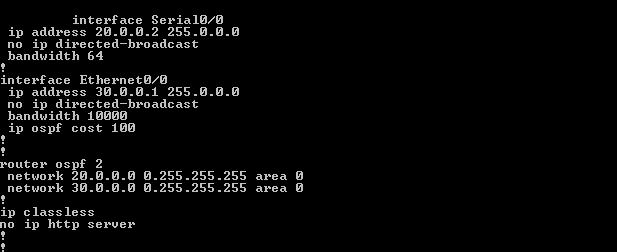
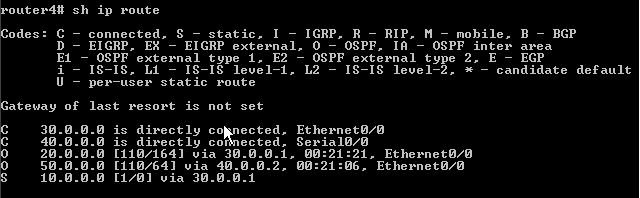
          router 1 configuration


                                                               router 2 configuration


                                                               router 3 configuration


                                                               router 4 configuration


                                               Testing the connectivity from work stations


                  PC1


                                                                          PC2


                                                                   OSPF Neighbor states 

1. Down 

This is the first stage of OSPF neighbor . If a neighbor is on down stage hello packet is not received from this particular neighbor, but packets can send to the neighbor .

2. Attempt

In this state router will send unicast hello packets to the neighbors in poll intervals . But as mentioned above these neighbors will not send hello packets in down state.

3. Init

Router will receive a valid hello packets from the neighbor, but receiving router id will not be added in the packets. 

4.  2-way

This state indicates the bi directional communication between two neighbor routers .The router's will share each others router ID in hello packets and as per that it will decide, need to become neighbor with this router or not. In OSPF network DR/BDR selection will happen as per the 2 way link with the neighbors.

5. Exstart

Once the DR/BDR selection is happened router's will start exchanging information by creating a virtual link inside the network (like a master/slave). Router's with higher router ID will became the master . 

6. Exchange

In this stage OSPF router's will exchange database descriptor (DBD) packets and this packet will contain LSA (Link State Advertisements) header's which will contain the details of entire LSA updates.
The contents of the DBD updates are cross checked with router LSA updates to make sure that information is passed to all neighbor's.

7.Loading

As per the DBD information and LSR (Link State Requests)router's will share the LSA , and this is the actual information share  happening stage.

8. Full

This is the fully synchronized state with all the router's database is updated with proper LSA updates. This is the normal state of a OSPF router.  If any of the router is not became full state , we can conclude that there will be an issue for forming adjacency  .

Multi Area OSPF configuration 

In larger networks we can find multiple area's in OSPF configuration than a single one . In multi area OSPF different kinds of router's are involved than single area OSPF

a. Internal router         - Router involves in a single area
b. Back born router   -   Router where atleast one onterface is in area 0
c. Area Border Router (ABR) - Router attached to multiple areas
d. Autonomous System Boundary Router - At least one interface connected to another AS.

Sample multi area OSPF network


configurations is almost same except loop back configuration in MOSPF.

OSPF treats Loopback interfaces as STUB NETWORKS and advertise them as HOST ROUTES (with mask /32) regardless of their configured/native mask.According to RFC 2328, Host routes are considered to be subnets whose mask is "all ones (0xffffffff)". In this state, the router's interface is looped back to the network in hardware or software. In this state, the interface is unavailable for regular data traffic. However, it is still available for testing like ICMP pings and BERT. For this reason, IP packets may still be addressed to an interface in Loopback state. Such interfaces are advertised in router-LSA as single host routes, whose destination IP address is the interface address.


Friday, November 9, 2012

Oracle RMAN backup script

                          Oracle RMAN back up script 

A detailed review 

Recovery Manager (RMAN) is an Oracle utility that can backup, restore and recover backup files.This will install along with oracle DB and communicates database server sessions to communicate each other for backup and restore. Let's look what is the benefits of RMAN than conventional backup mechanism .


Makes recovery time proportional to the amount of data recovered 
 Make backups proportional to the size of transitional changes, not to the size of the database. 
 Manage the complexity of backup and restore mechanism .
 Minimize the possibility of human errors .
 Make backups scalable  and reliable .
 Utilize all available hardware. 
There are two methods to take backups in oracle
a. Operating system commands to perform backup and SQL or SQL*Plus commands for recovery
b.Using RMAN to perform backup , restore and recovery.


RMAN Environment

a. RMAN executable

RMAN executable are automatically included with oracle installation and as default it is located at $ORACLE_HOME/bin .

b.RMAN target database

Target database is the database which you are going to take backup,restore.A single recovery cataloge* can be used to store metadata of multipe databases.

*Recovery cataloge is a set of tables and views used by RMAN to store the information about the target database and RMAN uses this cataloge to backup,restore and recover the database.

c. RMAN repository 

RMAN repository is the metadata which RMAN uses to store target database information and its backup and recovery operations .This will contain backup set pieces, target database schema, persistent configuration settings etc etc.

d. RMN media management Interface

This will be used for storing backup's in external media like tape drives. RMAN media interface will loads , unloads and labels backup media's .


RMAN Sample Script and its description 


Connecting to the RMAN

We can use different methods to connect to RMAN. Here i am using connecting to the target database using OS credentials as default. You can see mounted target database given as MBDB.


As per the sample script RMAN backup activities are pointed to a log file (/home/oracle/logs/ARTLBK/rmanlogs/backupincremental_0.$BACKUP_DAY.log) where $BACKUP_DAY is the folder for each days back up which is exported as an environment variable initially with the script .

Allocating the channel 

RMAN channel represents a stream of data to a device type from an established server session and backup, restore and recovery operations will be carried out through this established channel. as per our script we are creating 2 channels for the backup channel c1 and channel c2 and mentioned as device type and disk ( we are taking the backup in local disk ) . Also i want the backup should be happen at non default location (/oradata/backup/$BACKUP_DAY) because of the space constrain, so mentioned the same along with channel allocation here .


Backup format 


%d- Name of the backup
%T-Year,Month,Day (YYYYMMDD)
%t-Back up set time stamp which is a 4 byte value
%s-Back up set number and which is used for unique identification of the back up sets.
%p-The piece number with in the back up set and same will be incremented by 1.

Type of backups 

Full Backup- Full back up will back up all data files in the DB as block by block . Using a full back up you can recover the entire at that point of time.

Level1 Backup- This will take the back up of the blocks which are changed from last parent backup (Level0 or Level1). (please check the sample script given above)

Level0 Backup- This is almost identical as full back up except the empty blocks . 

Differential Incremental Backup -  As per this backup RMAN looks for the changed data blocks since from either last  Level0 or Level1backups.

Cumulative Incremental Backup- Same as differential backup incremental backup also takes the changed data blocks from last Level0 or Level1 backup and the exception is if the last backup is an incremental backup, this will take the backup of changes of changes which will reduce the restoration timing.


Also to remove old incremental backups ( becouse i am planning to take full backup on weekly basis) command is given to delete all incremental backups older than 8 days .

Listing the Backups 


You can view the list of backups using 
RMAN> LIST BACKUP; command 


Listing the Archive logs 

Archive logs can be cross checked using 
RMAN> LIST COPY; command 


Configuring the back up script in crontab 


I have configured the back up script in crontab which will be run at 2:30 AM every day


Tuesday, September 25, 2012

                                  DNS configuration in linux


Here i am giving you a basic idea about DNS (bind) configuration in linux server's . I have configured the bind package in Cent OS 5.4 version .

1. First we will check main packages required for bind configuration. I am listing the package names below
     a. bind-9.3.4-10.pl.el5
     b.bind-libs-9.3.4-10.pl.el5
     c.bind-chroot-9.3.4.-10.pl.el5


2. Once you install these packages you can see the main configuration file for the DNS server called named.conf. The purpose of this file to define the zone files to be used for each of your websites . Default location of this file will be /etc and you have to keep the copy of the same in /var/named/chroot/etc also for security purpose . Sample configuration is given below for reference .


3.  Details of the main configuration files for DNS and its locations are given below

FilePurposeBIND chroot LocationRegular BIND Location
named.confTells the names of the zone files to be used for each of your website domains./var/named/chroot/etc/etc
rndc.key
rndc.conf
Files used in named authentication/var/named/chroot/etc/etc
zone filesLinks all the IP addresses in your domain to their corresponding server/var/named/chroot/var/named/var/named


4.  Here as per our configuration zone files are vm.linux.com.zone ( forward lookup zone) and 0.1.168.192.in.addr.arpa (reverse lookup zone).


As per this configuration you can see the TTL ( time to leave ) value is 86400 seconds . This value indicates the time where the caching name server's will keep the answer from authority server , so the load to the authority server will be reduced .

Details of the forward look up zone file configuration is given bellow


FieldDescription
NameThe root name of the zone. The “@” sign is a shorthand reference to the current origin (zone) in the /etc/named.conf file for that particular database file.
ClassThere are a number of different DNS classes. Home/SOHO will be limited to the IN or Internet class used when defining IP address mapping information for BIND. Other classes exist for non Internet protocols and functions but are very rarely used.
TypeThe type of DNS resource record. In the example, this is an SOA resource record. Other types of records exist, which I’ll cover later.
Name-serverFully qualified name of your primary name server. Must be followed by a period.
Email-addressThe e-mail address of the name server administrator. The regular @ in the e-mail address must be replaced with a period instead. The e-mail address must also be followed by a period.
Serial-noA serial number for the current configuration. You can use the date format YYYYMMDD with an incremented single digit number tagged to the end. This will allow you to do multiple edits each day with a serial number that both increments and reflects the date on which the change was made.
RefreshTells the slave DNS server how often it should check the master DNS server. Slaves aren’t usually used in home / SOHO environments.
RetryThe slave’s retry interval to connect the master in the event of a connection failure. Slaves aren’t usually used in home / SOHO environments.
ExpiryTotal amount of time a slave should retry to contact the master before expiring the data it contains. Future references will be directed towards the root servers. Slaves aren’t usually used in home/SOHO environments.
Minimum-TTLThere are times when remote clients will make queries for subdomains that don’t exist. Your DNS server will respond with a no domain or NXDOMAIN response that the remote client caches. This value defines the caching duration your DNS includes in this response.


Different types of records on forward look up zone file is given bellow

Record TypeName FieldClass Field2Type FieldData Field
NSUsually blank1INNSIP address or CNAME of the name server
MXDomain to be used for mail. Usually the same as the domain of the zone file itself.INMXMail server DNS name
AName of a server in the domainINAIP address of server
CNAMEServer name aliasINCNAME"A" record name for the server
PTRLast octet of server’s IP addressINPTRFully qualified server name

5. Same way reverse look up configuration file is also located in the same location ( in our case it will be 0.1.168.192.in.addr.arpa which is located at /var/named/chroot/var/named )


6.    After configuring these zone files we can restart the named service as given below


7.     Login to the different server which is located at the same network and add the name server details in /etc/resolve.conf file . Format is given below


8.   After configuring the name server details you can test the DNS with below mentioned command

#dig FQDN ( Fully Qualified Domain Name) SOA

Sample output is given below


Your DNS configuration is successful .