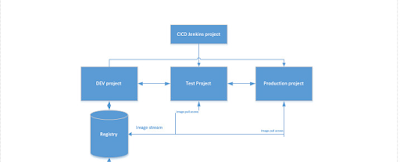
Jenkins is one of the major component for Continues integration and Continues Delivery ( CICD) setup in devops world which is reducing the complexity of SDLC environment. Here I am giving the example to implement CICD pipeline using openshift jenckins . Below is the architecture
In this scenario we have one core project called CICD and under that multiple projects as DEV/Test/Production . Also We should configure jenkins -ephemeral temple to setup the CICD as pre requisite.
CICD
Containing our Jenkins instance
Development
For building and developing our application images
Testing
For testing our application
Production
Hosting our production application
1. first create the projects as below
$oc new-project cicd --display-name='CICD Jenkins' --description='CICD Jenkins'
$oc new-project development --display-name='Development' --description='Development'
$ oc new-project testing --display-name='Testing' --description='Testing'
$ oc new-project production --display-name='Production' --description='Production'
2. now we have to configure RBAC in these projects, let the master project service account(cicd jenkins) should have edit access to all other projects
$ oc policy add-role-to-user edit system:serviceaccount:cicd:jenkins -n development
$ oc policy add-role-to-user edit system:serviceaccount:cicd:jenkins -n testing
$ oc policy add-role-to-user edit system:serviceaccount:cicd:jenkins -n production
3. Testing and production enviroenment should have image pull access from the dev env
$ oc policy add-role-to-group system:image-puller system:serviceaccounts:testing -n development
$oc policy add-role-to-group system:image-puller system:serviceaccounts:production -n development
. now create the jenkin ephemeral instance to the cicd jenkin project
$ oc project cicd
$ oc new-app --template=jenkins-ephemeral \
-p JENKINS_IMAGE_STREAM_TAG=jenkins-2-rhel7:latest \
-p NAMESPACE=openshift \
-p MEMORY_LIMIT=2048Mi \
-p ENABLE_OAUTH=true
5. Now create the pipe line inside the cicd project as below
$ oc create -n cicd -f https://raw.githubusercontent.com/devops-with-openshift/pipeline-configs/master/pipeline.yaml
6. we can keep the back up of the pipline config as below for future use
$oc export bc pipeline -o yaml -n cicd
7. deploy the app
$oc project development
$oc new-app --name=myapp openshift/php:5.6 https://github.com/devops-with-openshift/cotd.git#master
$oc expose service myapp --name=myapp --hostname=unixchips-development.192.168.137.3.xip.io
8. by default openshift will build and deploy the our application in the development project and use rolling deployment strategy for any changes.
we will be using the image stream that has been created to tag and promote in to the testing and production changes. We will be using the same image stream that can be
created to tag and promote in to the testing and production projects.
For that we need to create the deployment configuration in testing and production projects and to create the DC we need the ip address of the docker registry
We will get the docker registry ip from the development image stream
#oc get is -n development
Name DOCKER REPO
TAGS UPDATED
myapp 172.30.18.201:5000/development/myapp latest 13 minuted ago
If we have a cluster admin role we can check the docker registry service directly
#oc get svc docker-registry -n default
NAME CLUSTERIP EXTERNALIP PORTS AGE
docker-registry 172.30.18.201 <none> 5000/tcp 18d
Now create a deployment configuration in the testing project
oc project testing
oc create dc myapp --image=172.30.18.201:5000/deveopment/myapp:promoteQA
oc deploy myapp --cancel
The last step is needed becouse we have to cancel the autodeployment as we haven't used our pipeline to build/tag/promote our image yet
9. Next thing is we need to change the "ImagePullPolicy" for our container , by default it is set if notpresent , but out motive is to trigger the deployment when tag a new image
$oc patch dc/myapp -p '{"spec":{"template":{"spec":{"containets":[{"name":"default-container","imagePullPolicy":"Always"}]}}}}'
10. Now let's create the service and route
$oc expose dc myapp --port=8080
$oc expose service myapp --name=myapp --hostname=unixchips -testing.192.168.137.3
11. Repeat the same steps for production
$oc project production
$oc create dc myapp -- image=172.30.18.201:5000/development/myapp:promotePRD
$oc deploy myapp --cancel
$oc patch dc/myapp -p '{"spec":{"template":{"spec"{"containers":[{"name":"default-container","imagePullPolicy":"Always"}]}}}'
$oc deploy myapp --cancel
$oc expose dc myapp --port=8080
$oc expose service myapp --hostname=unixchips-production.192.168.173.3 --name=myapp
11. Let's run the pipeline deployment in cicd project
$oc start-build pipeline -n cicd
Once you login to the openshift-jenkins web console we can see that pipelines are created and waiting for the execution
In production pipeline will wait for the user input to execute .
Thank you for reading


Easy "water hack" burns 2 lbs OVERNIGHT
ReplyDeleteAt least 160 000 women and men are trying a simple and secret "liquid hack" to burn 2lbs every night while they sleep.
It is simple and works on anybody.
Here are the easy steps for this hack:
1) Get a clear glass and fill it with water half the way
2) Now learn this weight losing hack
and be 2lbs skinnier in the morning!
Thanks and good one Ratheesh.
ReplyDelete