Thursday, August 9, 2018

Docker installation and configuration

Here i am giving the example for docker installation and configuration in a Centos -7 system


Docker have 2 editions community edition and enterprise edition and docker CE has two update channels stable,edge


  • stable will give you updates on every quarter   
  • edge will give you updates on every month 

below are the details of the different server,cloud versions which supports CE and EE


1. First login to the server Centos-7 and run "yum-check-update" command


2. There is one installation script is available in the web called https://get.docker.com
we are installing the docker using that script


3. Once the docker is installed we need to make it start and enable the service 


4. Now we need to give the permission to the local user (here unixchips) to run docker commands 


5. Once you given the permission we can able to run the command without any sudo permission 


6. The best way to check the status of the docker installation is to run the below command 

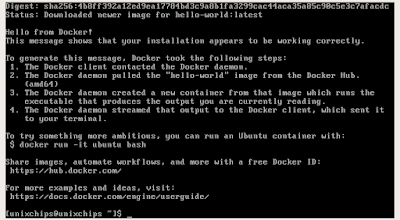
"docker run hello-world" and the expected out is given below 


7. Let's search the httpd image through the docker 


Also if we need to check the image details we will get it from "https://hub.docker.com"


8. Now we can pull the httpd image to the docker

If we click on the httpd official project we can see the latest one is apache 2.4.29


let's pull the image through docker command


9. Now if we check the docker mages we can see the downloaded http image


10 .If we need to remove one image we have to use the below command


More docker management commands will be explained in next post

Thanks for reading 

Tuesday, August 7, 2018

Docker concepts

What is a container

Traditionally software applications are deployed following a monolithic architecture approach  where each components are dependent or locked each other. The major drawback of  this approach is lack of reliability , scailability and high availability. Also traditional software deployment will be in the life cycle of test,dev,production environment which is a time consuming task.

     Containers are a new generation of virtual machines. That brings software development to a new level . Containers are an isolated set of different rules and resources inside a single operating system. This means containers can provide benefits as virtual machines but use less CPU,memory and storage.  There are several popular containers like LXC,Rocket,Docker.

 Container features and advantages 

Some of the major advantages of containers are as follows:
  • Efficient hardware resource consumption - if we are using normal virtualisation method to host our applications in a VM environment we may need OS to be installed in each VM to host different applications and sometime we can observed that major part of system resources are utilised by OS where the applications used to face lac of CPU and memory which will impact the performance. But in container technology we have OS installed in only in one system and different containers are installed on top of that . 

  • Application and service isolation - imagine if we have 10 applications hosted in a single server ,each applications has number of dependencies (like packages,libraries etc). If we need to update the packages we need to update all of it's dependencies which may impact another applications also. In container technology each application is isolated to each other and application update is an easy process.

  • Faster deployment - Using container images we can speed up the deployment . To restart applications in containers will take only some seconds where restarting the VM's will take minutes.The main reason is container does not need to restart an OS while restarting containers. 

  • Micro services architecture - Containers bring the application deployment to a new level called micro services architecture where our applications are parted to different  pieces and installing n different containers. For example if our application contains a webserver and a database server, usually in traditional level we will install it in different VM's . But in container we will install it in different containers on top of a single OS and allows them to communicate each other.

  • The stateless nature of containers - Containers are stainless which means you can create destroy bring up and down the containers at any time and it will not affect the application performance. This is one of the greatest features of the container.

 Difference between containers and VM's

                                       VM'S                                           Containers 


Each virtualized application includes not only the application binaries, but the OS also which may consume GB of space and memory

Where the container only contains application binaries and libraries which consumes MB of spaces and very less memory.

To create a VM it might take minutes where the container creation takes only seconds

The Average booting time of a VM is 600 seconds (depends up on the OS) where the container will be up with in seconds 

A VM snapshot might take minutes where the container snapshot will take only seconds

Docker container architecture 


Docker s one of the most popular application container technology now a days. This is an opensource technology and docker made partnership with industry reputed companies like Redhat,google. It allows creating sharing and running applications inside docker containers in an efficient manner 

 Docker uses client server type architecture 

Docker server: - This is a service running in an operating system. This service is responsible for downloading,building and running containers 

Docker Client: - This is a CLI tool which is responsible for communicating with docker server using REST API 

Docker main components 

Docker containers : - Isolated user space environments running the same or different applications and sharing the same host OS. Containers are created from docker mages 

Docker Images:- Docker templates or docker images are the bundle of application libraries and respective applications. These mages used to create containers and we can bring up the containers immediately .

Docker registries :- This is an image store and these registries can be public or private which means we can download the images from internet or we can create our own store.

Linux Containers

Below are the main features of the Linux kernel which is used to help docker functioning as a container 

Linux name spaces : - This is a feature of the linux kernel to isolate applications each other.This allows one set of linux processes to see one group of resources while allowing another set of processes. Examples of linux name spaces are Mount (mnt), Process ID (PID), Network, User ID, Inter Process Communication (IPC). One of the best example of name spaces is two processes in two different mounted namespaces may have different views of what the mounted root file system is. Each container has specific name spaces and same will be used inside respective containers only.

 Control groups ( C-Groups) : - This feature can be use to control the system resources effectively .
C-groups allows containers to control resource utilisation on container wise.

SE-Linux : - Security Enhanced linux is a mandatory access control used for isolated system access. Docker is using the SE-Linux to protect the hosts and isolate the containers each other.

Docker Image file systems 

Docker image s a read-only template to build containers. An image consist of number of layers which can be accessed as a single virtual file  system by the docker. Simply saying docker images are read only but we can add extra layers and create new images .


The container filesystem, used for every Docker image, is represented as a list of read-only
layers stacked on top of each other. These layers eventually form a base root filesystem for a
container. In order to make it happen, different storage drivers are being used. All the
changes to the filesystem of a running container are done to the top level image layer of a
container. This layer is called a Container layer. What it basically means is that several
containers may share access to the same underlying level of a Docker image, but write the
changes locally and uniquely to each other

Container Image layers 

Docker image contains number of layers that are combined to a single file system using storage driver.The layers (images) are created when commands are executed during image build process. Each layer except the last one is read only so what ever the changes are doing in the images will get reflected to the top layer only.


Docker Registries  

Docker registries are the method to share the image public or private mode which is also called docker store. This is highly scalable server side applications which you  can use to store download docker images. As it is open source project users can download the images and create new docer mages with necessary changes . Docker registries are 2 type 

Public registry 

You can start a container from an image stored in a public registry. By default, the Docker
daemon looks for and downloads Docker images from Docker Hub, which is a public
registry provided by Docker. However, many vendors add their own public registries to
the Docker configuration at installation time 

Private Registry 

Organisations which do not want some specific images which they don't want to share public will create their own registries called private registry . So it have access only from with in your internal  network.

You can easily install a private Docker registry by running a Docker container from a public
registry image. The private Docker registry installation process is no different from running
a regular Docker container with additional options.

Docker registries can be accessed from docker client through http method using REST API.

Installation and configuration of the docker will be explained in another post

Thanks for reading .....


Friday, August 3, 2018

Python OS functions explained


The OS module in python is very useful for testing the functionality of underlying operating system like linux,Mac,windows etc

before applying these modules we need to import the os module using the command  import os

The main os functions are given below

os.system ()- this is for executing shell command 


ex: os.system ("rpm --ivh aide*")  - this will install the aide rpm in the system 


os.stat () - This command will give the status of a file 


ex: print "getting the status of: ", os.stat('/usr/bin/python')

getting the status of:  posix.stat_result(st_mode=33261, st_ino=1051053, st_dev=2054, st_nlink=1, st_uid=0, st_gid=0, st_size=3542008, st_atime=1532933669, st_mtime=1511456897, st_ctime=1519176316)


os.environ() - Get the users environment


ex: 

import os

ux = os.environ['HOME']
print ux

out:/home/unixchips


os.chdir() # Move focus to a different directory

ex:

import os

print os.chdir('/home/unixchips/Desktop')

print (os.getcwd())

output: /home/unixchips/Desktop

os.getgid() # Return the real group id of the current process

ex:

import os

print os.getgid()

output:1000

os.getuid() # Return the current process’s user id

ex:

import os

print os.getuid()

output: 1000

os.getpid() # Returns the real process ID of the current process

ex:

import os

print os.getpid()

output:18616

getpass.getuser()# Return the name of the user logged

ex:

import getpass

print (getpass.getuser())

output:unixchips


os.access() # Check file status 

ex:

import os
path = '/tmp/test.txt'
print os.access(path, os.R_OK)

output:True

os.chmod() # Change the mode of path to the numeric mode

in this case you need to import a module called stat along with OS which will act a parameter , below are the parameter's used to change the ownership of a file 


stat.S_ISUID − Set user ID on execution.


stat.S_ISGID − Set group ID on execution.


stat.S_ENFMT − Record locking enforced.


stat.S_ISVTX − Save text image after execution.


stat.S_IREAD − Read by owner.


stat.S_IWRITE − Write by owner.


stat.S_IEXEC − Execute by owner.


stat.S_IRWXU − Read, write, and execute by owner.


stat.S_IRUSR − Read by owner.


stat.S_IWUSR − Write by owner.


stat.S_IXUSR − Execute by owner.


stat.S_IRWXG − Read, write, and execute by group.


stat.S_IRGRP − Read by group.


stat.S_IWGRP − Write by group.


stat.S_IXGRP − Execute by group.


stat.S_IRWXO − Read, write, and execute by others.


stat.S_IROTH − Read by others.


stat.S_IWOTH − Write by others.


stat.S_IXOTH − Execute by others.


ex:

import os, stat

os.chmod('/tmp/test.txt',stat.S_IRWXU)

(this will provide executable permission to the /tmp/test.txt by the owner )

output: -rwx------ 1 unixchips unixchips    0 Jul 31 23:39 test.txt


os.chown() # Change the owner and group id

(you need to perform this as a root user only)

ex:

import os, sys

os.chown("/tmp/test.txt", 1001, 1001)

output: -rwx------ 1 ratheesh  ratheesh     0 Jul 31 23:39 test.txt


os.umask(mask) # Set the current numeric umask


import os


os.umask(0777)
open("/tmp/sample.txt", "w").close()

output:                ---------- 1 root      root         0 Aug  1 21:04 sample.txt


os.getsize() # Get the size of a file


import os


print os.path.getsize("/tmp/test.txt")

output: 20 (as it is a 20B file)


os.environ() # Get the users environment

suppose if we want to get the home directory of current user root below program can be used 

ex:


import os

print os.environ.get('HOME')

output:root

to get all the environment variables of a user below program 


import os

for param in os.environ.keys():

    print "%20s %s" % (param,os.environ[param])

output
*******************************************************************************
/root
root@unixchips:~# nano env.py
root@unixchips:~# nano env1.py
root@unixchips:~# python env1.py 
                LANG en_IN
                TERM xterm-256color
               SHELL /bin/bash
           LESSCLOSE /usr/bin/lesspipe %s %s
          XAUTHORITY /home/unixchips/.Xauthority
            LANGUAGE en_IN:en
               SHLVL 1
QT_QPA_PLATFORMTHEME appmenu-qt5
            LESSOPEN | /usr/bin/lesspipe %s
                 PWD /root
             LOGNAME root
                USER root
                PATH /usr/local/sbin:/usr/local/bin:/usr/sbin:/usr/bin:/sbin:/bin:/snap/bin
                MAIL /var/mail/root
           LS_COLORS rs=0:di=01;34:ln=01;36:mh=00:pi=40;33:so=01;35:do=01;35:bd=40;33;01:cd=40;33;01:or=40;31;01:mi=00:su=37;41:sg=30;43:ca=30;41:tw=30;42:ow=34;42:st=37;44:ex=01;32:*.tar=01;31:*.tgz=01;31:*.arc=01;31:*.arj=01;31:*.taz=01;31:*.lha=01;31:*.lz4=01;31:*.lzh=01;31:*.lzma=01;31:*.tlz=01;31:*.txz=01;31:*.tzo=01;31:*.t7z=01;31:*.zip=01;31:*.z=01;31:*.Z=01;31:*.dz=01;31:*.gz=01;31:*.lrz=01;31:*.lz=01;31:*.lzo=01;31:*.xz=01;31:*.bz2=01;31:*.bz=01;31:*.tbz=01;31:*.tbz2=01;31:*.tz=01;31:*.deb=01;31:*.rpm=01;31:*.jar=01;31:*.war=01;31:*.ear=01;31:*.sar=01;31:*.rar=01;31:*.alz=01;31:*.ace=01;31:*.zoo=01;31:*.cpio=01;31:*.7z=01;31:*.rz=01;31:*.cab=01;31:*.jpg=01;35:*.jpeg=01;35:*.gif=01;35:*.bmp=01;35:*.pbm=01;35:*.pgm=01;35:*.ppm=01;35:*.tga=01;35:*.xbm=01;35:*.xpm=01;35:*.tif=01;35:*.tiff=01;35:*.png=01;35:*.svg=01;35:*.svgz=01;35:*.mng=01;35:*.pcx=01;35:*.mov=01;35:*.mpg=01;35:*.mpeg=01;35:*.m2v=01;35:*.mkv=01;35:*.webm=01;35:*.ogm=01;35:*.mp4=01;35:*.m4v=01;35:*.mp4v=01;35:*.vob=01;35:*.qt=01;35:*.nuv=01;35:*.wmv=01;35:*.asf=01;35:*.rm=01;35:*.rmvb=01;35:*.flc=01;35:*.avi=01;35:*.fli=01;35:*.flv=01;35:*.gl=01;35:*.dl=01;35:*.xcf=01;35:*.xwd=01;35:*.yuv=01;35:*.cgm=01;35:*.emf=01;35:*.ogv=01;35:*.ogx=01;35:*.aac=00;36:*.au=00;36:*.flac=00;36:*.m4a=00;36:*.mid=00;36:*.midi=00;36:*.mka=00;36:*.mp3=00;36:*.mpc=00;36:*.ogg=00;36:*.ra=00;36:*.wav=00;36:*.oga=00;36:*.opus=00;36:*.spx=00;36:*.xspf=00;36:
                HOME /root
             DISPLAY :0
                   _ /usr/bin/python
********************************************************************************


os.uname() # Return information about the current operating system

ex:
import os

print os.uname()

output:   ('Linux', 'unixchips', '4.15.0-24-generic', '#26~16.04.1-Ubuntu SMP Fri Jun 15 14:35:08 UTC 2018', 'x86_64')


os.chroot(path) # Change the root directory of the current process to path & os.getcwd

ex:
import os, sys

os.chdir("/tmp")
print os.getcwd()

output: /tmp

os.chroot(path) # Change the root directory of the current process to path

ex:

import os

print os.listdir('/tmp')

output: (will display the contents of the /tmp directory)

['.XIM-unix', 'systemd-private-5ccc0291bc60473d8d8fc248cff92fd3-systemd-timesyncd.service-OnYY3G', 'gnome-software-D9QEMZ', 'gnome-software-E1KUMZ', 'Temp-8984a84e-9508-434e-8180-a9cfbaa969c8', '.font-unix', 'gnome-software-VTVXMZ', 'gnome-software-N6ZDMZ', 'sample.txt', 'test.txt', '.wine-1000', '.Test-unix', 'gnome-software-3RD9MZ', '.org.chromium.Chromium.KfRkcm', 'systemd-private-5ccc0291bc60473d8d8fc248cff92fd3-rtkit-daemon.service-wVPLTC', 'unity_support_test.0', '.X0-lock', 'gnome-software-UMBENZ', 'gnome-software-IY0GNZ', 'gnome-software-4GZUMZ', '.ICE-unix', 'systemd-private-5ccc0291bc60473d8d8fc248cff92fd3-colord.service-BSHI7z', '.X11-unix', 'config-err-SiAh3i', 'gnome-software-3657MZ', '.org.chromium.Chromium.dI8BqE', 'gnome-software-SSMSMZ', 'gnome-software-XX9GMZ']


os.getloadavg() # Show queue averaged over the last 1, 5, and 15 minutes

ex:
import os

print os.getloadavg()

output: (which will display load average of  1,5,15 minutes)
(0.75, 0.69, 0.59) 


os.path.exists()# Check if a path exists

ex:

import os

print os.path.exists('/tmp/test.txt')

output: true


os.walk() # Print out all directories, sub-directories and files

The syntax of the os.walk will be 

os.walk(top[, topdown=True[, onerror=None[, followlinks=False]]])

  • top − Each directory rooted at directory, yields 3-tuples, i.e., (dirpath, dirnames, filenames)
  • topdown − If optional argument topdown is True or not specified, directories are scanned from top-down. If topdown is set to False, directories are scanned from bottom-up.
  • onerror − This can show error to continue with the walk, or raise the exception to abort the walk.
  • followlinks − This visits directories pointed to by symlinks, if set to true.

ex:


import os
for root, dirs, files in os.walk("/tmp", topdown=False):
   for name in files:
      print(os.path.join(root, name))
   for name in dirs:
      print(os.path.join(root, name))


output: ( List all directories /subdrectories  and files 


/tmp/systemd-private-5ccc0291bc60473d8d8fc248cff92fd3-systemd-timesyncd.service-OnYY3G/tmp
/tmp/gnome-software-D9QEMZ/debconf.socket
/tmp/gnome-software-E1KUMZ/debconf.socket
/tmp/gnome-software-VTVXMZ/debconf.socket
/tmp/gnome-software-N6ZDMZ/debconf.socket
/tmp/.wine-1000/server-806-3e0902/lock
/tmp/.wine-1000/server-806-3e0902
/tmp/gnome-software-3RD9MZ/debconf.socket
/tmp/.org.chromium.Chromium.KfRkcm/SingletonCookie
/tmp/.org.chromium.Chromium.KfRkcm/SingletonSocket
/tmp/systemd-private-5ccc0291bc60473d8d8fc248cff92fd3-rtkit-daemon.service-wVPLTC/tmp
/tmp/gnome-software-UMBENZ/debconf.socket
/tmp/gnome-software-IY0GNZ/debconf.socket
/tmp/gnome-software-4GZUMZ/debconf.socket
/tmp/.ICE-unix/2087
/tmp/systemd-private-5ccc0291bc60473d8d8fc248cff92fd3-colord.service-BSHI7z/tmp
/tmp/.X11-unix/X0
/tmp/gnome-software-3657MZ/debconf.socket
................................................

os.mkdir(path) # Create a directory named path with numeric mode mode

ex: 
import os 

os.mkdir('/tmp/ratheesh')

output: 
drwxr-xr-x 2 root root 4096 Aug  3 14:09 /tmp/ratheesh/


os.rmdir(path) # Remove (delete) the directory path


ex:
import os

os.rmdir('/tmp/ratheesh')

output:
root@unixchips:~# ls ld /tmp/ratheesh
ls: cannot access 'ld': No such file or directory
ls: cannot access '/tmp/ratheesh': No such file or directory


os.rename(src, dst) # Rename the file or directory src to dst

ex:
import os

os.rename('/tmp/test.txt', '/tmp/test1.txt')

output:
-rwx------ 1 ratheesh ratheesh 20 Aug  1 21:11 /tmp/test1.txt


Wednesday, June 20, 2018

AWS-Autoscaling

Autoscaling is the mechanism to scale out EC2 instances seamlessly and automatically when demand increases. It also helps to increase the resource vertically like CPU/Memory etc. A.S will also increase the number of instances as per the requirement .

What is the purpose of Autoscaling 


  • Load on application varies 
  • A good design must take care of varying load 
  • Since load spike cannot be anticipated always, manual scaling is not the solution 
  • Other solution is to over provision resources 
  • This is inefficient and costly 
  • Auto scaling is the best solution for dealing with varying load  

The Autoscaling process 


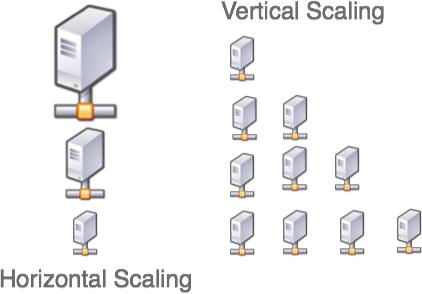
Horizontal & Vertical scaling 


Horizontal scaling means that you scale by adding more machines into your pool of resources.
 
Vertical scaling means that you scale by adding more power (CPU, RAM) to your existing machine

Steps for Autoscaling configuration 


1. Login to AWS console  go to services and select Autoscaling 


2. Select the first option to create the launch configuration 


3. Select the AMI ( Amazone Machine Image) from the My AMI session which will be used to create the new instances . You can create the image from any existing EC2 instances ( Detailed steps for creating AMI's are mentioned in the Load balacer configuration session )


4. Select the type of instances from the next step 


5. Next step is to give the name for Launch configuration ( As i didn't configured any IAM roles i have kept it as blank and cloud watch detailed monitoring also)


6. Select the storage and security group as per the requirement ( i have enabled port 22 and 80 in the security group )


7. Review the Launch configuration settings and create it 


8. Create / select the Key pair 


9. Now we have successfully configured the launch configuration as below 


10 .Now let us start the autoscaling configuration , provide the AS name, VPC details ( default) and subnet details where the autoscaling instances need to be expanded 


11. We have to mention the target group which includes the information about the EC2 instances which is including the ASG . The health check grace period of the instances is mentioned as 300 sec


12. Configure the scaling policies and alarm as below ( Here when the average CPU utilisation is greater than or equal to 90 % for 2 consecutive period of 5 minuets , it will create a new instance )


13.Now review the settings and configure the auto scaling group


14. You can see 2 new instances are created with the autoscaling group tag and you can add any existing instances to the new autoscaling group also.


We have created a sample autoscaling setup ..


Thanks for reading the content and welcoming your valuable feedback 


Monday, June 18, 2018

Sample Cloudformation template and it's implementation in AWS

AWS cloud formation is a model that helps to design and implement the AWS services.We can create a template which describes the AWS resources which is needs to be build (ex: EC2 instances and RDS services ) and AWS cloud formation takes care of its implementation. Also we don't need to individually create and configure AWS resources and figure out what dependent on what , cloudformation will figure out that and implement it


AWS Cloudformation Structure 


1. Format version ( optional)

This describes AWS cloudformation version that the template confirms to

2. Description ( optional )

A text that describes the template , this will alays follow the template format version session

3. Parameters

Specifies the values that you are passing with the template at run time. (when you create or update the stack .

4. Mappings (optional)

Mappings of the  keys and its respective values are used to specify conditional parameter values. We can match a key to a corresponding value by using Fn::FindInMap function

5.Conditions

Defines conditions that control whether certain resources are created or whether
certain resource properties are assigned a value during stack creation or update. For
example, you could conditionally create a resource that depends on whether the
stack is for a production or test environment.

6. Resources

Specifies the stack resources and their properties, such as an Amazon Elastic
Compute Cloud instance or an Amazon Simple Storage Service bucket.

7. Outputs

Describes the values that are returned whenever you view your stack's properties.

Cloudformation template 

This cloud formation template will create a EC2 instance and add them to a new load balancer 


**********************************************************************

{"AWSTemplateFormatVersion" : "2010-09-09",

{

"Resources" : {
 
"EC2Instance" : {
   
"Type" : "AWS::EC2::Instance",
   
"Properties" : {
     
"SecurityGroups" : [ { "Ref" : "InstanceSecurityGroup" } ],
     
"KeyName" : "mykey",
     
"ImageId" : "ami-006b0447cf00d6804"
   
}
 
},

 
"InstanceSecurityGroup" : {
   
"Type" : "AWS::EC2::SecurityGroup",
   
"Properties" : {
     
"GroupDescription" : "Enable SSH access via port 22",
     
"SecurityGroupIngress" : [
       
{ "IpProtocol" : "tcp", "FromPort" : "22", "ToPort" : "22", "CidrIp" : "0.0.0.0/0" },
       
{ "IpProtocol" : "tcp", "FromPort" : "80", "ToPort" : "80", "CidrIp" : "0.0.0.0/0" }
     
]
   
}
 
},

 
"ElasticLoadBalancer" : {
   
"Type" : "AWS::ElasticLoadBalancing::LoadBalancer",
   
"Properties" : {
     
"AvailabilityZones" : { "Fn::GetAZs" : "" },
     
"Instances" : [ { "Ref" : "EC2Instance" } ],
     
"Listeners" : [ {
       
"LoadBalancerPort" : "80",
       
"InstancePort" : "80",
       
"Protocol" : "HTTP"
     
} ],
     
"HealthCheck" : {
         
"Target" : { "Fn::Join" : [ "", ["HTTP:", "80", "/"] ] },
       
"HealthyThreshold" : "3",
       
"UnhealthyThreshold" : "5",
       
"Interval" : "30",
       
"Timeout" : "5"
     
}
   
}
 
}

}
}
}

****************************************************************************

No let's upload the template to a stack and test

1. Select the cloudformation from the service list


2. Create the new stack and select the stack file which you have created above


3. Specify the stack name , in this case i have mentioned as unixchipstack


4. You can tag the stack for identification purpose


5. Once you review and upload the stack you can see new EC2 instance is created as below


If any error's in the stack template same can be highlighted in event tab and according to that e have to troubleshoot


Monday, June 11, 2018

Amazon VPC and its sample configuration

A virtual private cloud (VPC) is a virtual network which is similar to our traditional data center, but VPC supports the scalable  infrastructure resources of AWS. Amazone VPC allows you to use launch Amazone web services resources to a virtual network that you have defined . Also this will help you to created isolated networks for your applications or clients

The main components of the Amazon VPC is provided below

VPC: A virtual private cloud (VPC) is a virtual network dedicated to your AWS account. It is logically isolated from other virtual networks in the AWS cloud. You can launch your AWS resources, such as Amazon EC2 instances, into your VPC. You can configure your VPC; you can select its IP address range, create subnets, and configure route tables, network gateways, and security settings.

Subnet: A subnet is a range of IP addresses in your VPC. You can launch AWS resources into a subnet that you select. Use a public subnet for resources that must be connected to the Internet, and a private subnet for resources that won't be connected to the Internet.

Route Table: A route table contains a set of rules, called routes, that are used to determine where network traffic is directed.
Each subnet in your VPC must be associated with a route table; the table controls the routing for the subnet. A subnet can only be associated with one route table at a time, but you can associate multiple subnets with the same route table.

Internet Gateway: An Internet gateway is a horizontally scaled, redundant, and highly available VPC component that allows communication between instances in your VPC and the Internet. It therefore imposes no availability risks or bandwidth constraints on your network traffic.

Network ACLs: A network access control list (ACL) is an optional layer of security for your VPC that acts as a firewall for controlling traffic in and out of one or more subnets. You might set up network ACLs with rules similar to your security groups in order to add an additional layer of security to your VPC.


Different VPC scenarios

Scenario  Usage 
Scenario 1: VPC with a Single Public Subnet Your instances run in a private, isolated section of the AWS cloud with direct access to the Internet
Scenario 2: VPC with Public and Private Subnets (NAT) In addition to containing a public subnet, this configuration adds a private subnet whose instances are not addressable from the Internet. Instances in the private subnet can establish outbound connections to the Internet via the public subnet using Network Address Translation (NAT).
Scenario 3: VPC with Public and Private Subnets and Hardware VPN Access This configuration adds an IPsec Virtual Private Network (VPN) connection between your Amazon VPC and your data center - effectively extending your data center to the cloud while also providing direct access to the Internet for public subnet instances in your Amazon VPC.
Scenario 4: VPC with a Private Subnet Only and Hardware VPN Access Your instances run in a private, isolated section of the AWS cloud with a private subnet whose instances are not addressable from the Internet. You can connect this private subnet to your corporate data center via an IPsec Virtual Private Network (VPN) tunnel.


Steps for creating the VPC setup

1. Login to the AWS console and go to networking session and click on the VPC ( you can go to the EC2 session also and can see the VPC below that in left side bar as below), click on the create VPC and provide the VPC name (unixchipsVP) and IPV4 CIDR block range also (10.3.0.0/16)


2.  Once you create the VPC if you check the relative components of these you can see one route table is created along with a network ACL, and a security group also


3. Let's create the public subnet with an understandable naming convention as 10.3.0.0-ap-aouth-1a_public, select the VPC as unixchipsVP and associate the CIDR range as 10.3.0.0/16 (sample configuration is below)


4. Create the private subnet as below , name should be 10.3.2.0-ap-south-1b-private and the CIDR range will be 10.3.2.0/24


5. Now we have to create the internet gateway and attach the same to VPC as below


6. Configure the route table to provide the access to the internet gateway


7. Select the subnet assosiations from the down tab and associate the public subnet with that


8. Now in the public subnet we need a public ip to be auto assigned
Go to subnet – select the public subnet- subnet actions- modify autoassign ip settings


9. Create the instances in public and private subnet ( make sure you are using seperate security groups for both )

Instance settings are given below

Settings for Public


Settings for private


Also make sure you are configuring the inbound rules of the private instance security group as as custom and the network range should be 10.3.0.0/16


10 . Now connect to the public instance and from there try to access the private instance and you should be able to access as below


To ssh to the private instance , copy the .pem file attached to your public webserver and provide the ownership as 400 and connect as below


Ok now you have created the VPC and logged in to the attached instances , now we have to attach a NAT instance with that and that i will explain in other session .

Thanks for sharing the feed back