Friday, July 26, 2019

configuring search ( Azure search & Elastic search) in azure


Azure search

Azure Search leverages the Microsoft’s Azure cloud infrastructure to bring robust search-as-a-service solutions, without the need to manage the infrastructure. With Azure Search, you can use a simple REST API or .NET SDK to bring your data into Azure and start configuring your search application.

Azure Search is an API based service that provides REST APIs via protocols such as OData or integrated libraries such as the .NET SDK. Primarily the service consists of the creation of data indexes and search requests within the index.

Data to be searched is uploaded into logical containers called indexes. An interface schema is created as part of the logical index container that provides the API hooks used to return search results with additional features integrated into Azure Search. Azure Search provides two different indexing engines: Microsofts own proprietary natural language processing technology or Apache Lucene analyzers.[3] The Microsoft search engine is ostensibly built on Elasticsearch.[4]

Below is one of the example using azure search 


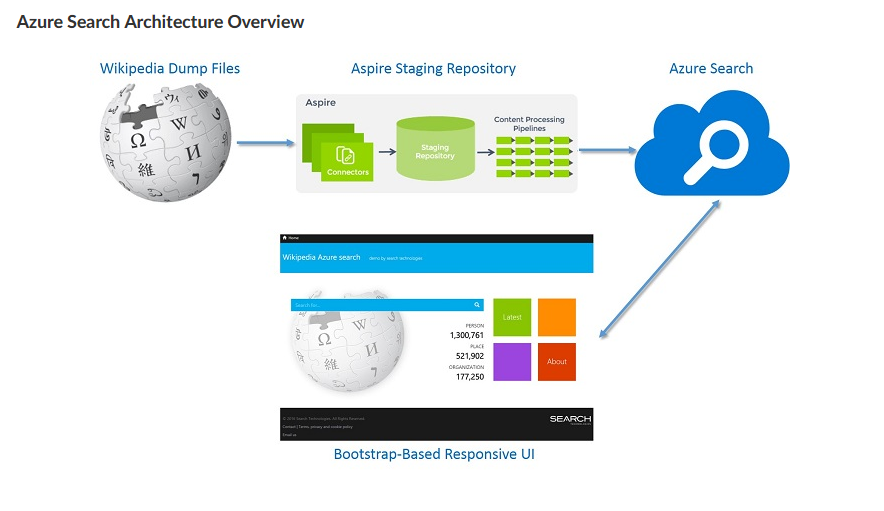
Imagine to build a search application to avail the contents of wikipedia which contains massive amount of data, we can use third party repository connector to dump data directly from wikipedia  to azure search . So the process was a seamless transfer as no disks were needed to store data at any time.


With Azure Search, users will be able to quickly create a search index, upload data into it, and set up search queries through the aid of common API calls and using the Microsoft .NET SDK. Once the search index is up and running, the solution ensures that it can instantly return search results even if there is a high volume of traffic coming in or there is a large amount of data that needs to be transmitted.

The search-as-a-service cloud solution allows users to enable search capabilities on their applications so they can improve how users search and access content. These capabilities include search suggestions, faceted navigation, filters, hit highlighting, sorting, and paging. It also allows users to take advantage of its natural language processing techniques, modern query syntaxes, and sophisticated search features. Last but not least, Azure Search offers monitoring and reporting features. Users can gain insights into what people are searching for and entering into the search box as well as access reports that show metrics related to queries, latency, and more.


Configuring azure search using azure portal 

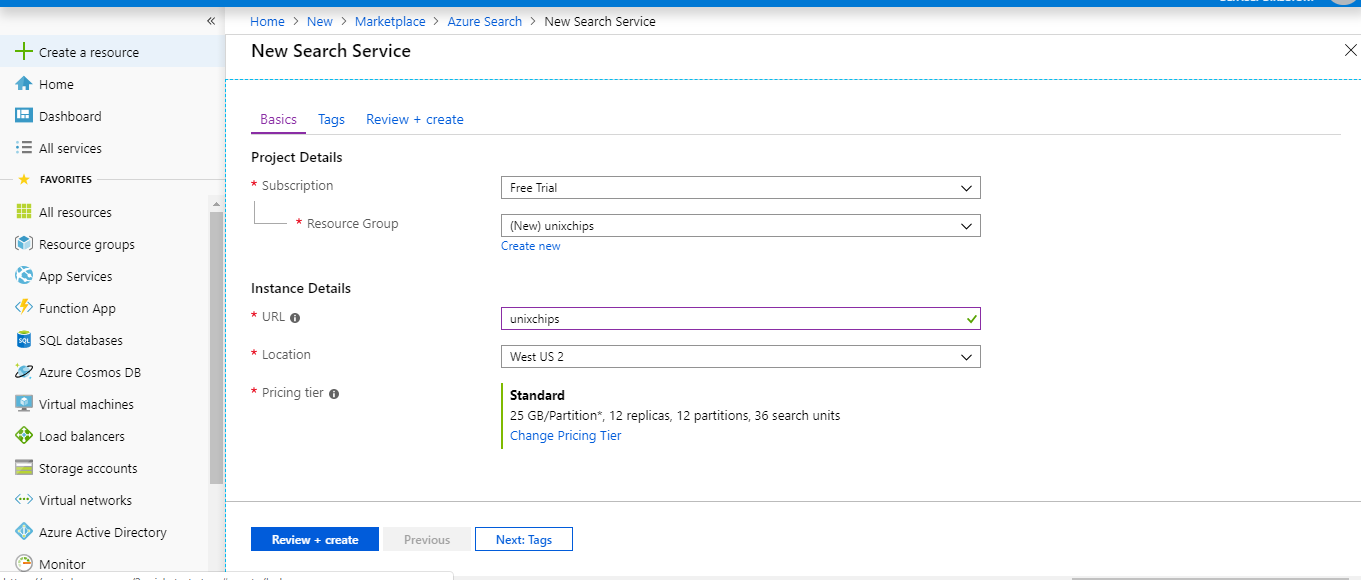
1. Login to azure - create resource - search for azure search 


2. Provide the subscription and url details as below , also mention the url which will used to access the search portal, also need to mention the subscription details 


3. If we need to access the search api through applications we need key details which is available in the key session of the search .


4  Let's scale the search as per the needs. If we have standard subscription we can have 2 dimensional scaling called partitions and replicas.

Replicas distribute workloads across the service and Partitions allow for scaling of document counts as well as faster data ingestion by spanning your index over multiple Azure Search Units. I have created 2 partitions and 2 replicas .


5. Now let's create the index for search .. click on the search service which you created and click add index. provide the index name ( here i have provided the index name as hotel). search mode is analyzinginfixmatching ( which is the only mode available which performs the flexible matching of the phrases at the beginning or middle of the sentences) .  Next is to define the fields , as an example i have defined id, hotel name, address, description, base rate .  Type we have to provide as either ed. string ( which is the text data ) and edm.double ( which is the floating values)

Different key fields for the index's are

Searchable - Full-text searchable, subject to lexical analysis such as word-breaking during indexing. If you set a searchable field to a value like "sunny day", internally it will be split into the individual tokens "sunny" and "day".

Filterable- Referenced in $filter queries. Filterable fields of type Edm.String or Collection(Edm.String)do not undergo word-breaking, so comparisons are for exact matches only. For example, if you set such a field f to "sunny day", $filter=f eq 'sunny' will find no matches, but $filter=f eq 'sunny day' will.

Sortable - By default the system sorts results by score, but you can configure sort based on fields in the documents. Fields of type Collection(Edm.String) cannot be sortable.

facetable- Typically used in a presentation of search results that includes a hit count by category (for example, hotels in a specific city). This option cannot be used with fields of type Edm.GeographyPoint. Fields of type Edm.String that are filterable, sortable, or facetable can be at most 32 kilobytes in length. For details, see Create Index (REST API).

Key - Unique identifier for documents within the index. Exactly one field must be chosen as the key field and it must be of type Edm.String.

Retrieveble- Determines whether the field can be returned in a search result. This is useful when you want to use a field (such as profit margin) as a filter, sorting, or scoring mechanism, but do not want the field to be visible to the end user. This attribute must be true for key fields.


6. Next to import data to the indexes. we have multiple sources to import the data ( azure blobs, tables, cosmos DB, Azure SQL DB) etc. Here i am taking the sample as data source ( which is the hotels sample.


7. Let's run the query to fetch the data , here we are giving hotel's with spa felicity as a sample and we can see the search result which is available in json format.


Comparison on Azure search and elastic search

Azure search


  1. Full text search and text analysis, the basic use case. Query syntax provides the set of operators, such as logical, phrase search, suffix, and precedence operators, and also includes fuzzy and proximity searches, term boosting, and regular expressions.
  2. Cognitive searchthis functionality is in preview mode (please note, that this information is valid at the time of writing the article). It was designed to allow image and text analysis, which can be applied to an indexing pipeline to extract text information from raw content with the help of AI-powered algorithms.
  3. Data integration, Azure Search provides the ability to use indexers to automatically crawl Azure SQL Database, Azure Cosmos DB, or Azure Blob storage for searchable content. Azure Blob indexers can perform a text search in the documents (including Microsoft Office, PDF, and HTML documents).
  4. Linguistic analysis, you can use custom lexical analyzers and language analyzers from Lucene or Microsoft for complex search queries using phonetic matching and regular expressions or for handling (like gender, irregular plural nouns, word-breaking, and more).
  5. Geo-search, functionality to search for information by geographic locations or order the search results based on their proximity to a physical location that can be beneficial for the end users.
  6. User experience features, includes everything that facilitates user interaction with search functionality: auto-complete (preview), search suggestions, associating equivalent terms by synonyms, faceted navigation (which can be used as the code behind a categories list or for self-directed filtering), hit highlighting, sorting, paging and throttling results.
  7. Relevance, the key benefit of which is scoring profiles to model the relevance of values in the documents. For example, you can use it, if you want to show hot vacancies higher in the search results.


Elastic search


  1. Textual Search, this is the most common use case, and primarily Elasticsearch is used where there is lots of text, and the goal is to find any data for the best match with a specific phrase.
  2. Text search and structured data allows you to search product by properties and name.
  3. Data Aggregation, as it is mentioned in official documentation, the aggregation’s framework helps provide aggregated data based on a search query. It is based on simple building blocks called aggregations, that can be composed in order to build complex summaries of the data. There are many different types of aggregations, each with its own purpose and output.
  4. JSON document storage represents a JSON object with some data, which is the basic information unit in Elasticsearch that can be indexed.
  5. Geo Search provides the ability to combine geo and search. Such functionality is slowly becoming a must have for any content website.
  6. Auto Suggest is also one of the very popular functions nowadays, which allows the user to receive suggested queries as they type.
  7. Autocomplete this is one of the very helpful functions, which autocompletes the search field on partially-typed words, based on the previous searches.

Configuring ELK ( elastic search ,logstash, Kibana) in azure 

1. First we have to configure an ubuntu instance for the installation purpose under new resource group called elk.


2. create the inbound rules for the access to the port 9200 and 5601 for ELK access 


3. Login to the instance using ssh and execute the below commands

  sign in the elastic key for downloading the package 

root@elktest:~# wget -qO - https://artifacts.elastic.co/GPG-KEY-elasticsearch | sudo apt-key add -
OK

  update the packages 


root@elktest:~# sudo apt-get update
Hit:1 http://azure.archive.ubuntu.com/ubuntu bionic InRelease
Get:2 http://azure.archive.ubuntu.com/ubuntu bionic-updates InRelease [88.7 kB]
Get:3 http://azure.archive.ubuntu.com/ubuntu bionic-backports InRelease [74.6 kB]
Get:4 http://security.ubuntu.com/ubuntu bionic-security InRelease [88.7 kB]
Get:5 http://azure.archive.ubuntu.com/ubuntu bionic-updates/main amd64 Packages [693 kB]
Get:6 http://azure.archive.ubuntu.com/ubuntu bionic-updates/main Translation-en [254 kB]
Get:7 http://azure.archive.ubuntu.com/ubuntu bionic-updates/universe amd64 Packages [976 kB]
Get:8 http://azure.archive.ubuntu.com/ubuntu bionic-updates/universe Translation-en [295 kB]
Get:9 http://security.ubuntu.com/ubuntu bionic-security/main amd64 Packages [460 kB]
Get:10 http://security.ubuntu.com/ubuntu bionic-security/main Translation-en [158 kB]
Get:11 http://security.ubuntu.com/ubuntu bionic-security/universe amd64 Packages [574 kB]
Get:12 http://security.ubuntu.com/ubuntu bionic-security/universe Translation-en [187 kB]
Fetched 3850 kB in 1s (2671 kB/s)
Reading package lists... Done


root@elktest:~# sudo apt-get install apt-transport-https
Reading package lists... Done
Building dependency tree
Reading state information... Done
The following NEW packages will be installed:
  apt-transport-https
0 upgraded, 1 newly installed, 0 to remove and 4 not upgraded.
Need to get 1692 B of archives.
After this operation, 153 kB of additional disk space will be used.
Get:1 http://azure.archive.ubuntu.com/ubuntu bionic-updates/universe amd64 apt-transport-https all 1.6.11 [1692 B]
Fetched 1692 B in 0s (103 kB/s)
Selecting previously unselected package apt-transport-https.
(Reading database ... 55690 files and directories currently installed.)
Preparing to unpack .../apt-transport-https_1.6.11_all.deb ...
Unpacking apt-transport-https (1.6.11) ...
Setting up apt-transport-https (1.6.11) ...

next is to add the repository definition to the system

root@elktest:~# echo "deb https://artifacts.elastic.co/packages/7.x/apt stable main" | sudo tee -a /etc/apt/sources.list.d/elastic-7.x.list
deb https://artifacts.elastic.co/packages/7.x/apt stable main
root@elktest:~#

Next is to install the elastic search 

root@elktest:~# sudo apt-get update && sudo apt-get install elasticsearch
Hit:1 http://azure.archive.ubuntu.com/ubuntu bionic InRelease
Hit:2 http://azure.archive.ubuntu.com/ubuntu bionic-updates InRelease
Hit:3 http://azure.archive.ubuntu.com/ubuntu bionic-backports InRelease
Get:4 https://artifacts.elastic.co/packages/7.x/apt stable InRelease [5620 B]
Get:5 https://artifacts.elastic.co/packages/7.x/apt stable/main amd64 Packages [10.0 kB]
Hit:6 http://security.ubuntu.com/ubuntu bionic-security InRelease
Fetched 15.6 kB in 1s (25.5 kB/s)
Reading package lists... Done
Building dependency tree
Reading state information... Done
The following NEW packages will be installed:
  elasticsearch
0 upgraded, 1 newly installed, 0 to remove and 4 not upgraded.
Need to get 337 MB of archives.
After this operation, 536 MB of additional disk space will be used.
Get:1 https://artifacts.elastic.co/packages/7.x/apt stable/main amd64 elasticsearch amd64 7.2.0 [337 MB]
Fetched 337 MB in 10s (33.7 MB/s)
Selecting previously unselected package elasticsearch.
(Reading database ... 55694 files and directories currently installed.)
Preparing to unpack .../elasticsearch_7.2.0_amd64.deb ...
Creating elasticsearch group... OK
Creating elasticsearch user... OK
Unpacking elasticsearch (7.2.0) ...
Processing triggers for ureadahead (0.100.0-21) ...
Setting up elasticsearch (7.2.0) ...
Created elasticsearch keystore in /etc/elasticsearch
Processing triggers for systemd (237-3ubuntu10.24) ...
Processing triggers for ureadahead (0.100.0-21) ...

Once the installation is completed connect to the /etc/elasticsearch/elasticsearch.yml file and change the nodename , port and cluster initial master IP ( which is the private IP of the instance) 
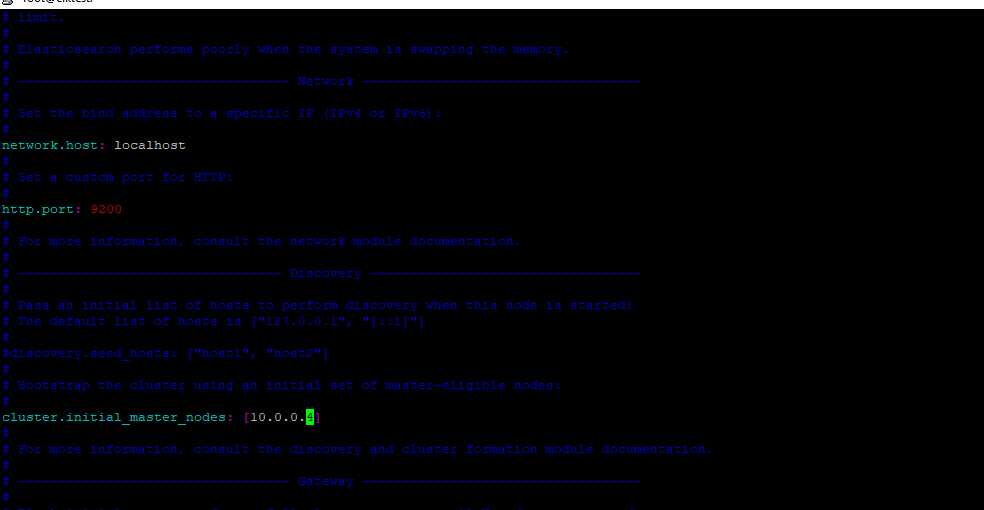


restart the service 

Once you restart the service we should get the output as below  if we access the http://localhost:9200 through curl 

root@elktest:~# curl "http://localhost:9200"
{
  "name" : "elktest",
  "cluster_name" : "elasticsearch",
  "cluster_uuid" : "_na_",
  "version" : {
    "number" : "7.2.0",
    "build_flavor" : "default",
    "build_type" : "deb",
    "build_hash" : "508c38a",
    "build_date" : "2019-06-20T15:54:18.811730Z",
    "build_snapshot" : false,
    "lucene_version" : "8.0.0",
    "minimum_wire_compatibility_version" : "6.8.0",
    "minimum_index_compatibility_version" : "6.0.0-beta1"
  },
  "tagline" : "You Know, for Search"
}

Installing Logstash 

Install the latest java , and once the java is installed check the version 

root@elktest:~# java -version
openjdk version "11.0.3" 2019-04-16
OpenJDK Runtime Environment (build 11.0.3+7-Ubuntu-1ubuntu218.04.1)
OpenJDK 64-Bit Server VM (build 11.0.3+7-Ubuntu-1ubuntu218.04.1, mixed mode, sharing)


install the logstash

root@elktest:~# sudo apt-get install logstash
Reading package lists... Done
Building dependency tree
Reading state information... Done
The following NEW packages will be installed:
  logstash
0 upgraded, 1 newly installed, 0 to remove and 4 not upgraded.
Need to get 173 MB of archives.
After this operation, 300 MB of additional disk space will be used.
Get:1 https://artifacts.elastic.co/packages/7.x/apt stable/main amd64 logstash all 1:7.2.0-1 [173 MB]
Fetched 173 MB in 6s (29.6 MB/s)
Selecting previously unselected package logstash.
(Reading database ... 70880 files and directories currently installed.)
Preparing to unpack .../logstash_1%3a7.2.0-1_all.deb ...
Unpacking logstash (1:7.2.0-1) ...
Setting up logstash (1:7.2.0-1) ...
Using provided startup.options file: /etc/logstash/startup.options
OpenJDK 64-Bit Server VM warning: Option UseConcMarkSweepGC was deprecated in version 9.0 and will likely be removed in a future release.
WARNING: An illegal reflective access operation has occurred
WARNING: Illegal reflective access by org.jruby.util.SecurityHelper to field java.lang.reflect.Field.modifiers
WARNING: Please consider reporting this to the maintainers of org.jruby.util.SecurityHelper
WARNING: Use --illegal-access=warn to enable warnings of further illegal reflective access operations
WARNING: All illegal access operations will be denied in a future release
/usr/share/logstash/vendor/bundle/jruby/2.5.0/gems/pleaserun-0.0.30/lib/pleaserun/platform/base.rb:112: warning: constant ::Fixnum is deprecated
Successfully created system startup script for Logstash

Next step is to install the kibana 

root@elktest:~# sudo apt-get install kibana
Reading package lists... Done
Building dependency tree
Reading state information... Done
The following NEW packages will be installed:
  kibana
0 upgraded, 1 newly installed, 0 to remove and 4 not upgraded.
Need to get 218 MB of archives.
After this operation, 558 MB of additional disk space will be used.
Get:1 https://artifacts.elastic.co/packages/7.x/apt stable/main amd64 kibana amd64 7.2.0 [218 MB]
Fetched 218 MB in 7s (31.0 MB/s)
Selecting previously unselected package kibana.
(Reading database ... 87098 files and directories currently installed.)
Preparing to unpack .../kibana_7.2.0_amd64.deb ...
Unpacking kibana (7.2.0) ...
Processing triggers for ureadahead (0.100.0-21) ...
Setting up kibana (7.2.0) ...
Processing triggers for systemd (237-3ubuntu10.24) ...
Processing triggers for ureadahead (0.100.0-21) ...

Open the kibana configuration file and make sure we have updated below details in /etc/kibana/kibana.yml


restart the kibana service 

Now we can access the kibana from the browser 


Let's install Beats which is the lightweight data shippers install as agents on your servers to send specific types of operational data to Elasticsearch.


root@elktest:/var/log/kibana# sudo apt-get install metricbeat
Reading package lists... Done
Building dependency tree
Reading state information... Done
The following NEW packages will be installed:
  metricbeat
0 upgraded, 1 newly installed, 0 to remove and 4 not upgraded.
Need to get 37.6 MB of archives.
After this operation, 162 MB of additional disk space will be used.
Get:1 https://artifacts.elastic.co/packages/7.x/apt stable/main amd64 metricbeat amd64 7.2.0 [37.6 MB]
Fetched 37.6 MB in 2s (22.8 MB/s)
Selecting previously unselected package metricbeat.
(Reading database ... 170061 files and directories currently installed.)
Preparing to unpack .../metricbeat_7.2.0_amd64.deb ...
Unpacking metricbeat (7.2.0) ...
Setting up metricbeat (7.2.0) ...
Processing triggers for ureadahead (0.100.0-21) ...
Processing triggers for systemd (237-3ubuntu10.24) ...

Start the Metricbeat 

root@elktest:/var/log/kibana# sudo service metricbeat start
root@elktest:/var/log/kibana# /etc/init.d/metricbeat status
● metricbeat.service - Metricbeat is a lightweight shipper for metrics.
   Loaded: loaded (/lib/systemd/system/metricbeat.service; disabled; vendor preset: enabled)
   Active: active (running) since Fri 2019-07-26 15:14:45 UTC; 14s ago
     Docs: https://www.elastic.co/products/beats/metricbeat
 Main PID: 39450 (metricbeat)
    Tasks: 10 (limit: 9513)
   CGroup: /system.slice/metricbeat.service
           └─39450 /usr/share/metricbeat/bin/metricbeat -e -c /etc/metricbeat/metricbeat.yml -path.home /usr/share/metricbeat -path.config /etc/metricbeat -path.data…at

Jul 26 15:14:47 elktest metricbeat[39450]: 2019-07-26T15:14:47.309Z        INFO        [index-management]        idxmgmt/std.go:394        Set setup.templa… is enabled.
Jul 26 15:14:47 elktest metricbeat[39450]: 2019-07-26T15:14:47.309Z        INFO        [index-management]        idxmgmt/std.go:399        Set setup.templa… is enabled.
Jul 26 15:14:47 elktest metricbeat[39450]: 2019-07-26T15:14:47.309Z        INFO        [index-management]        idxmgmt/std.go:433        Set settings.ind… is enabled.
Jul 26 15:14:47 elktest metricbeat[39450]: 2019-07-26T15:14:47.310Z        INFO        [index-management]        idxmgmt/std.go:437        Set settings.ind… is enabled.
Jul 26 15:14:47 elktest metricbeat[39450]: 2019-07-26T15:14:47.311Z        INFO        template/load.go:169        Existing template will be overwritten, a… is enabled.
Jul 26 15:14:47 elktest metricbeat[39450]: 2019-07-26T15:14:47.712Z        INFO        template/load.go:108        Try loading template metricbeat-7.2.0 to…lasticsearch
Jul 26 15:14:48 elktest metricbeat[39450]: 2019-07-26T15:14:48.002Z        INFO        template/load.go:100        template with name 'metricbeat-7.2.0' loaded.
Jul 26 15:14:48 elktest metricbeat[39450]: 2019-07-26T15:14:48.002Z        INFO        [index-management]        idxmgmt/std.go:289        Loaded index template.
Jul 26 15:14:48 elktest metricbeat[39450]: 2019-07-26T15:14:48.805Z        INFO        [index-management]        idxmgmt/std.go:300        Write alias succ…y generated.
Jul 26 15:14:48 elktest metricbeat[39450]: 2019-07-26T15:14:48.808Z        INFO        pipeline/output.go:105        Connection to backoff(elasticsearch(ht… established
Hint: Some lines were ellipsized, use -l to show in full.
root@elktest:/var/log/kibana#


When we check using below command we can see Metric beat is started monitoring the server and create an Elasticsearch index which you can define in Kibana

root@elktest:/var/log/kibana# curl 'localhost:9200/_cat/indices?v'
health status index                              uuid                   pri rep docs.count docs.deleted store.size pri.store.size
yellow open   metricbeat-7.2.0-2019.07.26-000001 ct8Ts4oNQguZP8vkg6aShg   1   1        355            0    885.5kb        885.5kb
green  open   .kibana_task_manager               GdpCyTl3QnGax2fEIbOaJw   1   0          2            0     37.5kb         37.5kb
green  open   .kibana_1                          SQCc6TFTRE2nYjRsdYT9cQ   1   0          3            0     12.2kb         12.2kb
root@elktest:/var/log/kibana#

To begin analyzing these metrics, open up the Management → Kibana → Index Patterns page in Kibana. You’ll see the newly created ‘metricbeat-*’ index already displayed:


Configured the visualization as per our needs .. 


Thank you for reading 

Monday, July 22, 2019

Explaining ARM templates


In Azure and Azure Stack, the Azure Resource Manager is the management layer (API) where you connect to for deploying resources. Here we are going to look at the Azure Resource Template and how to use it when deploying resources.When deploying resources with Azure Resource Manager keep in mind the following aspects. It is:

  • Template-driven – Using templates to deploy all resources.
  • Declarative – You declare the resources you want to have instead of imperative where you need to make rules.
  • Idempotent – You can deploy the template over and over again without affecting the current state of resources.
  • Multi-service – All services can be deployed using Azure Resource Manager, Website, Storage, VMs etc.
  • Multi region- You can choose in which region you would like to deploy the resources.
  • Extensible – Azure Resource Manager is extensible with more resource providers and thus resources.
We can deploy resource templates using azure portal, power shell and azure CLI. But before deploying the resources we have to create the "resource group" first because we have to mention the resource group first while starting the deployment .

Basically ARM template is a jason file and its structure is given below 


Element name Required Description
$schema Yes Location of the JSON schema file that describes the version of the template language.
version yes version of the templete for deplyment for reference purpose 
parameters No Values that are provided when deployment is executed to customize resource deployment.
variables No Values that are used as JSON fragments in the template to simplify template language expressions.
resources Yes Types of services that are deployed or updated in a resource group.
outputs No Values that are returned after deployment.

Parameters:

When you start a new deployment and you have parameters defined in your resource template then these needs to be entered in before the deployment can start. It are values used for that specific deployment. These parameters are then used in other sections of the template. When we look at a parameter in the parameters section it can be for example a value to select a specific Operating System version when deploying a Virtual Machine:

For example definition of parameters for a linux VM is given below 

*************************************************************

    "$schema": "http://schema.management.azure.com/schemas/2015-01-01/deploymentTemplate.json#",
    "contentVersion": "1.0.0.0",
    "parameters": {
        "location": {
            "type": "string"
        },
        "networkInterfaceName": {
            "type": "string"
        },
        "networkSecurityGroupName": {
            "type": "string"
        },
        "networkSecurityGroupRules": {
            "type": "array"
        },
        "subnetName": {
            "type": "string"
        },
        "virtualNetworkName": {
            "type": "string"
        },
        "addressPrefixes": {
            "type": "array"
        },
        "subnets": {
            "type": "array"
        },
        "publicIpAddressName": {
            "type": "string"
        },
        "publicIpAddressType": {
            "type": "string"
        },
        "publicIpAddressSku": {
            "type": "string"
        },
        "virtualMachineName": {
            "type": "string"
        },
        "virtualMachineRG": {
            "type": "string"
        },
        "osDiskType": {
            "type": "string"
        },
        "virtualMachineSize": {
            "type": "string"
        },
        "adminUsername": {
            "type": "string"
        },
        "adminPassword": {
            "type": "secureString"
        },
        "diagnosticsStorageAccountName": {
            "type": "string"
        },
        "diagnosticsStorageAccountId": {
            "type": "string"
        },
        "diagnosticsStorageAccountType": {
            "type": "string"
        },
        "diagnosticsStorageAccountKind": {
            "type": "string"
        }
    },
***************************************************************

Here the name of the parameter is must have entity and same should be valid javascript identifier . Also type of the parameter also required , type can be string, intiger,array, object all are in a valid JASON format.

While deployment either we can mention the parameters when it is prompted or we can mention the parameters in a separate file called parameters.json


New-AzureResourceGroupDeployment -Name Testdeployment -ResourceGroupName unixchips -TemplateParameterFile .\templatename.params.json -TemplateFile .\templatename.json

Variables:

variables are the values  that can be constructed for example from parameters to create a variable and use that in other sections of your deployment template. Also a single value across multiple resources .

in our case for linux vm below are the variables defined 

****************************************************
"variables": {
        "nsgId": "[resourceId(resourceGroup().name, 'Microsoft.Network/networkSecurityGroups', parameters('networkSecurityGroupName'))]",
        "vnetId": "[resourceId(resourceGroup().name,'Microsoft.Network/virtualNetworks', parameters('virtualNetworkName'))]",
        "subnetRef": "[concat(variables('vnetId'), '/subnets/', parameters('subnetName'))]"

Resources:

The resources session is the actual parameters which we are going to deploy or update. This can be collection of resources and its configuration settings . We can define them directly in to the resource or we can populate through parameter file.

***************************************************

    "resources": [
        {
            "name": "[parameters('networkInterfaceName')]",
            "type": "Microsoft.Network/networkInterfaces",
            "apiVersion": "2018-10-01",
            "location": "[parameters('location')]",
            "dependsOn": [
                "[concat('Microsoft.Network/networkSecurityGroups/', parameters('networkSecurityGroupName'))]",
                "[concat('Microsoft.Network/virtualNetworks/', parameters('virtualNetworkName'))]",
                "[concat('Microsoft.Network/publicIpAddresses/', parameters('publicIpAddressName'))]"
            ],
            "properties": {
                "ipConfigurations": [
                    {
                        "name": "ipconfig1",
                        "properties": {
                            "subnet": {
                                "id": "[variables('subnetRef')]"
                            },
                            "privateIPAllocationMethod": "Dynamic",
                            "publicIpAddress": {
                                "id": "[resourceId(resourceGroup().name, 'Microsoft.Network/publicIpAddresses', parameters('publicIpAddressName'))]"
                            }
                        }
                    }
                ],
                "networkSecurityGroup": {
                    "id": "[variables('nsgId')]"
                }
            }
        },
        {
            "name": "[parameters('networkSecurityGroupName')]",
            "type": "Microsoft.Network/networkSecurityGroups",
            "apiVersion": "2019-02-01",
            "location": "[parameters('location')]",
            "properties": {
                "securityRules": "[parameters('networkSecurityGroupRules')]"
            }
        },
        {
            "name": "[parameters('virtualNetworkName')]",
            "type": "Microsoft.Network/virtualNetworks",
            "apiVersion": "2019-04-01",
            "location": "[parameters('location')]",
            "properties": {
                "addressSpace": {
                    "addressPrefixes": "[parameters('addressPrefixes')]"
                },
                "subnets": "[parameters('subnets')]"
            }
        },
        {
            "name": "[parameters('publicIpAddressName')]",
            "type": "Microsoft.Network/publicIpAddresses",
            "apiVersion": "2019-02-01",
            "location": "[parameters('location')]",
            "properties": {
                "publicIpAllocationMethod": "[parameters('publicIpAddressType')]"
            },
            "sku": {
                "name": "[parameters('publicIpAddressSku')]"
            }
        },
        {
            "name": "[parameters('virtualMachineName')]",
            "type": "Microsoft.Compute/virtualMachines",
            "apiVersion": "2018-10-01",
            "location": "[parameters('location')]",
            "dependsOn": [
                "[concat('Microsoft.Network/networkInterfaces/', parameters('networkInterfaceName'))]",
                "[concat('Microsoft.Storage/storageAccounts/', parameters('diagnosticsStorageAccountName'))]"
            ],
            "properties": {
                "hardwareProfile": {
                    "vmSize": "[parameters('virtualMachineSize')]"
                },
                "storageProfile": {
                    "osDisk": {
                        "createOption": "fromImage",
                        "managedDisk": {
                            "storageAccountType": "[parameters('osDiskType')]"
                        }
                    },
                    "imageReference": {
                        "publisher": "Canonical",
                        "offer": "UbuntuServer",
                        "sku": "18.04-LTS",
                        "version": "latest"
                    }
                },
                "networkProfile": {
                    "networkInterfaces": [
                        {
                            "id": "[resourceId('Microsoft.Network/networkInterfaces', parameters('networkInterfaceName'))]"
                        }
                    ]
                },
                "osProfile": {
                    "computerName": "[parameters('virtualMachineName')]",
                    "adminUsername": "[parameters('adminUsername')]",
                    "adminPassword": "[parameters('adminPassword')]"
                },
                "diagnosticsProfile": {
                    "bootDiagnostics": {
                        "enabled": true,
                        "storageUri": "[concat('https://', parameters('diagnosticsStorageAccountName'), '.blob.core.windows.net/')]"
                    }
                }
            }
        },
        {
            "name": "[parameters('diagnosticsStorageAccountName')]",
            "type": "Microsoft.Storage/storageAccounts",
            "apiVersion": "2018-07-01",
            "location": "[parameters('location')]",
            "properties": {},
            "kind": "[parameters('diagnosticsStorageAccountKind')]",
            "sku": {
                "name": "[parameters('diagnosticsStorageAccountType')]"
            }
        }
    ],
******************************************************************

Main elements of resources are below ...

apiVersion: - This is a must have value which is the version of the API supports resources.

Type: Type of the resource. This value is a combination of the namespace of the resource provider and the resource type that the resource provider supports.

Name: Name of the resource 

Location: Supported geo-locations of the provided resource.

Tags: Tags that are associated with the resource.

Depends on: Resources that the resource being depends on . The dependencies between resources are evaluated and resources are deployed in their dependent order

Properties: Resource specific configuration settings

Outputs:

In this session we can define the output of the deployment template.These values can be for example a connection string from a deployment of a database. This can then be passed into another deployment to use for example as connection string for a website you are going to deploy.

************************************************************
"outputs": {
        "adminUsername": {
            "type": "string",
            "value": "[parameters('adminUsername')]"
        }


Output name: Name of the output value, must be a java script identifier 
Type:   Type of the output value, which is same as template input parameters
Value: Template language expression .

Deploying the ARM template using azure portal 

1. First we have to create a sample template file for the resource creation ( here the linux VM) . The best method is to fill the required fields needed to create the vm and download the template as below . Click on the download the template for automation.


2. This will create a zipped folder named "template", and it includes below contents in general . deploy (powershell script) , deploy (shell script), deployer.rb (ruby script),DeploymentHelper.cs, parameters.json (parameter file used for deployment) and Template.json ( common template file) 


3. Now go to create resource and select Template deployment  and click on the edit custom template option . You can upload the down loaded template.json file in the portal and upload the parameter file in the edit parameter option


4. Once you uploaded the required template.json and parameter.json we can select the agree option and click the purchase button. This will validate all the data and deployment starts after the validation.


5. Once the deployment is succeeded if we check the virtual machine option we can see the VM is created successfully with all the data passed through parameter.json.


In next session i will explain how to deploy the ARM using power shell...

Login to the cloudshell from your portal.

1. First create the resource group named unixchips1

PS Azure:\> New-AzResourceGroup -Name unixchips1 -Location centralus

output
***********
ResourceGroupName : unixchips1
Location          : centralus
ProvisioningState : Succeeded
Tags              :
ResourceId        : /subscriptions/3878c3d5-8450-4eec-9a0f-183f6c4e569e/resourceGroups/unixchips1


Azure:/


2. Now deploy the template and parameters file using below command


PS /home/unixchips> New-AzResourceGroupDeployment -ResourceGroupName unixchips1 -TemplateFile /home/unixchips/template.json -TemplateParameterFile /home/unixchips/parameters.json

output
*****************************************************
DeploymentName          : template
ResourceGroupName       : unixchips1
ProvisioningState       : Succeeded
Timestamp               : 7/23/19 7:46:23 AM
Mode                    : Incremental
TemplateLink            :
Parameters              :
                          Name                             Type                       Value
                          ===============================  =========================  ==========
                          location                         String                     eastus
                          networkInterfaceName             String                     unixchipstest1766
                          networkSecurityGroupName         String                     unixchipstest1-nsg
                          networkSecurityGroupRules        Array                      [
                            {
                              "name": "SSH",
                              "properties": {
                                "priority": 300,
                                "protocol": "TCP",
                                "access": "Allow",
                                "direction": "Inbound",
                                "sourceAddressPrefix": "*",
                                "sourcePortRange": "*",
                                "destinationAddressPrefix": "*",
                                "destinationPortRange": "22"
                              }
                            },
                            {
                              "name": "HTTP",
                              "properties": {
                                "priority": 320,
                                "protocol": "TCP",
                                "access": "Allow",
                                "direction": "Inbound",
                                "sourceAddressPrefix": "*",
                                "sourcePortRange": "*",
                                "destinationAddressPrefix": "*",
                                "destinationPortRange": "80"
                              }
                            }
                          ]
                          subnetName                       String                     default
                          virtualNetworkName               String                     unixchips-vnet
                          addressPrefixes                  Array                      [
                            "10.0.0.0/24"
                          ]
                          subnets                          Array                      [
                            {
                              "name": "default",
                              "properties": {
                                "addressPrefix": "10.0.0.0/24"
                              }
                            }
                          publicIpAddressName              String                     unixchipstest1-ip
                          publicIpAddressType              String                     Dynamic
                          publicIpAddressSku               String                     Basic
                          virtualMachineName               String                     unixchipstest1
                          virtualMachineRG                 String                     unixchips
                          osDiskType                       String                     Premium_LRS
                          virtualMachineSize               String                     Standard_D2s_v3
                          adminUsername                    String                     unixchips
                          adminPassword                    SecureString
                          diagnosticsStorageAccountName    String                     unixchipsdiag
                          diagnosticsStorageAccountId      String                     Microsoft.Storage/storageAccounts/unixchipsdiag
                          diagnosticsStorageAccountType    String                     Standard_LRS
                          diagnosticsStorageAccountKind    String                     Storage

Outputs                 :
                          Name             Type                       Value
                          ===============  =========================  ==========
                          adminUsername    String                     unixchips

DeploymentDebugLogLevel :


Thank you for reading 

Wednesday, July 17, 2019

Azure Vnet configuration

What is virtual network 


A Virtual Network, also known as a VNet is an isolated network within the Microsoft Azure cloud.
VNets are synonymous to AWS VPC (Virtual Private Cloud), providing a range of networking features such as the ability to customize DHCP blocks, DNS, routing, inter-VM connectivity, access control and Virtual Private Networks (VPN).

The main functions of vnet's are below


  • Create a dedicated private cloud-only VNet Sometimes you don't require a cross-premises configuration for your solution. When you create a VNet, your services and VMs within your VNet can communicate directly and securely with each other in the cloud. You can still configure endpoint connections for the VMs and services that require Internet communication, as part of your solution.
  • Securely extend your data center With VNets, you can build traditional site-to-site (S2S) VPNs to securely scale your datacenter capacity. S2S VPNs use IPSEC to provide a secure connection between your corporate VPN gateway and Azure.
  • Enable hybrid cloud scenarios VNets give you the flexibility to support a range of hybrid cloud scenarios. You can securely connect cloud-based applications to any type of on-premises system such as mainframes and Unix systems.


Below are the key components within Microsoft Azure Virtual Networks.


SUBNETS

A subnet is a range of IP addresses in the VNet, you can divide a VNet into multiple subnets for organization and security. Additionally you can configure VNet routing tables and Network Security Groups (NSG) to a subnet

IP ADDRESSES

There are 2 types of IP addresses that can be assigned to an Azure resource - Public or Private.
Public
  • Used for internet/Azure public facing communication.
  • A dynamic IP is assigned to the VM, by default. At the point the VM is started /stopped the IP is released/renewed.
  • A static IP can be assigned to a VM which is only released when the VM is deleted
Private

  • Used for connectivity within a VNet, and also when using a VPN gateway or ExpressRoute.
  • A dynamic IP, by default, is allocated to the VM from the resources subnet via DHCP. At the point the VM is started/stopped the IP may be released/renewed based on the DHCP lease.
  • A static IP can be assigned to the VM.


NETWORK SECURITY GROUPS

Network Security Groups (NSGs) allow you to permit or deny traffic (via a rule base), to either a subnet or a network interface. By default the inbound and outbound rules include an implied deny all. Finally NSGs are stateful, meaning that the TCP sequence numbers are checked in addition to, if the connection is already established.

LOADBALANCING


    Azure provides three different load balancing solutions. They are,

  • Azure Traffic Manager - Similar to Route53 within AWS, DNS is used to direct traffic to necessary destination. There are 3 destination selection methods - failover, performance or round robin.
  • Azure Loadbalancer - Performs L4 loadbalancing within a Virtual Network. Currently only supports round robin distribution.
  • Azure Application Gateway - Performs L7 loadbalancing. Supports HTTP Request based loadbalancing, SSL Termination and cookie based persistence.

ROUTING TABLES

Although Azure automates the provisioning of system routes, there may be a scenario where you need to further dictate how your traffic is routed.
Routes are applied on traffic leaving a subnet, and traffic can be sent to a next hop of either a virtual network, virtual network gateway or virtual machine.

Creating a vnet and attaching the VM's 

Let's create a vnet using azure portal as below 

1. connect to the azure portal, go to resources and select virtual network


2. Provide the details including  address space , resource group, subnet details etc


3. Now let's create 2 VM's in this network ( one is linux and another is windows) . Both the VM's should get the IP range of our network .Also we have enabled port 22 and 80 on the VM .


4. Let's create another VM windows with the IP of 10.1.0.5 in the same network .


5. If we try to ping to windows vm from outside using public IP we are unable to because the ICMP is blocked by windows firewall.


6. Let's enable the ICMP in windows firewall using powershell command as below


(New-NetFirewallRule -DisplayName "Allow ICMPv4-In" -Protocol ICMPv4)


\


7. And now if we try to ping to that IP we should be able to


Enabling communication between vnet's using Vnet-Vnet peer 


Now we can configure the communication between the Vnet's using virtual gateway and vet peer.

1. First click on "unixvnet1 - subnets and add gateway subnet . It will automatically create the gateway IP . Here 10.1.0.64/28


2. Create a virtual network gateway for unixvnet1 as below  (provide gateway type as VPN and VPN type is route typed)


3. We have to create a VPN gateway as below . select first virual network gateway as vnetgateway1 and second gateway as vnetgateway2 .


4. Create the same procedure for unixvnet2 also from step 1 to 3 and create a VM in second vnet as below . While creating VPN gateway we need to select first virtual network gateway as vnetgateway2 and second gateway as vnetgateway1. This will make sure the communication vice versa .


5. Now if we try to ping from 10.1.0.4 to 10.2.0.5 ( VM in vnet2) we can see we are able to ping


We have successfully configured two vnet's (unixchipsvnet1 & unixchipsvnet2) and established communication between two vnets using VPN gateways .

Thank you for reading