This blog is about building azure AKS and configuring the same with Azure Arc. As we know AKS is the kubernetes platform build in with azure and Azure Arc is the architecture platform which will help us to manage hybrid and on premises resources as a better way.
The basic architecture diagram and functionality details of the azure arc is given below

From the diagram we can understand that Azure arc is a common platform which is used to manage hybrid/buildin server's, databases, containers . Anthos by Google and Azure Arc are examples of the control planes running the public cloud orchestrating and managing resources deployed in diverse environments. This investment is becoming key to delivering the promise of hybrid cloud and multicloud technologies. For example, a Linux VM deployed in Google Compute Engine (GCE) is managed by Azure. The logs and metrics from the VM are ingested into Azure Monitoring and Log Analytics. Similarly, BigQuery Omni, the multicloud flavor of BigQuery, can be deployed in AWS. Anthos can take control of Azure Kubernetes Clusters (AKS) and deploy workloads to it. All this is possible with the extension of the control plane and observability offerings.
1. Let's create a resource group now using azure cli as below . we have created the resource group named as unixchipsrg2

2. Next step is to verify Microsoft.operationsManagement and Microsoft.operationalInsights are registered on your subscription as below . We can see that it is not registered from the below output

3. Let's register the subscription with Microsoft.operationsManagement and Microsoft.operationalInsights using below command


4. So we have registered the subscription with respective name spaces and now we have to create the AKS as below . The AKS name is unixchipsaks in the eastus region . This command will create a detailed output in jason format as below and i have omitted the output due to space constrain

output
***********************************************************************
PS /home/unixchips> az aks create --resource-group
unixchipsrg2 --name unixchipsaks --node-count 2 --enable-addons monitoring
--generate-ssh-keys
AAD role propagation
done[############################################] 100.0000%{
"aadProfile": null,
"addonProfiles": {
"omsagent": {
"config": {
"logAnalyticsWorkspaceResourceID":
"/subscriptions/994b8397-cf9d-4f89-9aca-55b9313f9996/resourcegroups/defaultresourcegroup-eus/providers/microsoft.operationalinsights/workspaces/defaultworkspace-994b8397-cf9d-4f89-9aca-55b9313f9996-eus"
},
"enabled": true,
"identity": {
"clientId": "aec78f06-6bcb-4ed3-ba3a-e507fc79e48d",
"objectId": "cf8fa808-c6e5-4258-8519-32a0a05f72cf",
"resourceId":
"/subscriptions/994b8397-cf9d-4f89-9aca-55b9313f9996/resourcegroups/MC_unixchipsrg2_unixchipsaks_eastus/providers/Microsoft.ManagedIdentity/userAssignedIdentities/omsagent-unixchipsaks"
}
}
},
"agentPoolProfiles": [
------------------output is omitted -----------------------------------------------------------------------
5. We have created a 2 node cluster called unixchipsaks and we have to connect to the cluster using kubectl command. If we are using azure cli kubectl is installed as default and we may need to install it separately if we are connecting from outside. Let's create the credentials inside the azure cli to connect to the kubernetes cluster

6. We can check the kubernetes cluster status as below and both the nodes are ready for deployment

7. Let's deploy an application in these nodes . We are using the application called azure-vote application and it contains a python application instance and a redis instance. So we have 2 deployments and service configurations . Let's merge both these deployments in a single yamal file as below
***************************************************************************
apiVersion: apps/v1
kind: Deployment
metadata:
name: azure-vote-back
spec:
replicas: 1
selector:
matchLabels:
app: azure-vote-back
template:
metadata:
labels:
app: azure-vote-back
spec:
nodeSelector:
"beta.kubernetes.io/os": linux
containers:
- name: azure-vote-back
image: mcr.microsoft.com/oss/bitnami/redis:6.0.8
env:
- name: ALLOW_EMPTY_PASSWORD
value: "yes"
resources:
requests:
cpu: 100m
memory: 128Mi
limits:
cpu: 250m
memory: 256Mi
ports:
- containerPort: 6379
name: redis
---
apiVersion: v1
kind: Service
metadata:
name: azure-vote-back
spec:
ports:
- port: 6379
selector:
app: azure-vote-back
---
apiVersion: apps/v1
kind: Deployment
metadata:
name: azure-vote-front
spec:
replicas: 1
selector:
matchLabels:
app: azure-vote-front
template:
metadata:
labels:
app: azure-vote-front
spec:
nodeSelector:
"beta.kubernetes.io/os": linux
containers:
- name: azure-vote-front
image: mcr.microsoft.com/azuredocs/azure-vote-front:v1
resources:
requests:
cpu: 100m
memory: 128Mi
limits:
cpu: 250m
memory: 256Mi
ports:
- containerPort: 80
env:
- name: REDIS
value: "azure-vote-back"
---
apiVersion: v1
kind: Service
metadata:
name: azure-vote-front
spec:
type: LoadBalancer
ports:
- port: 80
selector:
app: azure-vote-front
**************************************************************************
8. save the above configuration in a yml file named as zure-vote.yml and pass it to the configuration as below

9. We can monitor the progress as below and from the output the app is deployed successfully

10. we can connect to the app using the public IP 52.188.27.38 using port 80 as default

Also the pods are running successfully


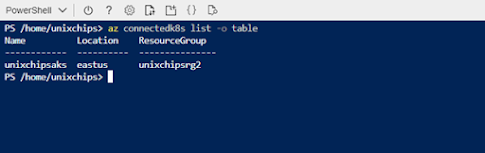
11. Next step is to configure the Azure arc with our cluster unixchipsaks. For that we have install the connectedk8s extension with the azure cli

12. Let's register the existing AKS cluster with the azure arc as below. Please keep it in mind that the port number 443 and 9418 should be open to outside to connect to the azure arc


14. If we check the azure portal-kubernetes-azure arc we can see that our cluster is succefully registered in the azure arc

We can use the azure arc to manage /monitor and troublshoot kubernetes cluster and integrate it with GitOPS for centralized manifest management . I will explain those details in another post .
Thank you for reading ...
This comment has been removed by the author.
ReplyDeleteGood read on DevOps!!
ReplyDeleteCloud DevOps Services
DevOps Services India